<?xml version="1.0" encoding="utf-8"?>
<feed xmlns="http://www.w3.org/2005/Atom">
    <id>https://m.ac/</id>
    <title>m.ac</title>
    <updated>2026-07-07T01:42:58.489Z</updated>
    <generator>https://github.com/jpmonette/feed</generator>
    <author>
        <name>Xiufeng Guo</name>
        <email>i@m.ac</email>
        <uri>https://m.ac</uri>
    </author>
    <link rel="alternate" href="https://m.ac/"/>
    <link rel="self" href="https://m.ac/atom.xml"/>
    <subtitle>Personal notes by Xiufeng Guo on the internet, business, and life.</subtitle>
    <rights>© 2026 m.ac</rights>
    <entry>
        <title type="html"><![CDATA[Using the Latest Bun on Cloudflare Pages]]></title>
        <id>https://m.ac/latest-bun-cloudflare-pages/</id>
        <link href="https://m.ac/latest-bun-cloudflare-pages/"/>
        <updated>2026-07-06T21:56:42.000Z</updated>
        <summary type="html"><![CDATA[Use the current Bun release on Cloudflare Pages by skipping automatic dependency installation, installing Bun through npm, and putting npm's global binary directory first in PATH.]]></summary>
        <content type="html"><![CDATA[<p>Cloudflare Pages supports Bun, at least on paper. The <a href="https://developers.cloudflare.com/pages/configuration/build-image/#languages-and-runtime">Pages build image documentation</a> lists Bun in the supported runtime table, lets you override it with <code>BUN_VERSION</code>, and says the v3 build image defaults to Bun <code>1.2.15</code>.</p>
<p>That sounds simple until you ask for <code>BUN_VERSION=latest</code> and your deployment fails before your app even gets a chance to embarrass itself.</p>
<p>As of July 6, 2026, the latest Bun release is <code>1.3.14</code>, while Cloudflare Pages still defaults to Bun <code>1.2.15</code>. After a few rounds of testing, the most reliable fix I found is to skip Cloudflare&#39;s automatic dependency install, install Bun through npm with scripts enabled, and force the build shell to use npm&#39;s global binary path before Cloudflare&#39;s preinstalled Bun.</p>
<h2>1. What goes wrong with BUN_VERSION=latest</h2>
<p>Cloudflare&#39;s documented path is to set <code>BUN_VERSION</code> in your Pages project. For the default preinstalled version, that can be fine. For <code>latest</code> or any other specific version, it can fail during Bun installation with a <code>403</code> from the installer path:</p>
<pre><code class="language-log">2026-07-06T01:18:13.088163Z	Installing bun latest
2026-07-06T01:18:13.34936Z	Plugin bun&#39;s list-all callback script failed with output:
2026-07-06T01:18:13.351082Z	curl: (22) The requested URL returned error: 403
2026-07-06T01:18:13.353396Z
2026-07-06T01:18:13.365851Z	bun  is already installed
2026-07-06T01:18:13.61882Z	Plugin bun&#39;s list-all callback script failed with output:
2026-07-06T01:18:13.619964Z	curl: (22) The requested URL returned error: 403
2026-07-06T01:18:13.622207Z
2026-07-06T01:18:13.63001Z	Error: Exit with error code: 1
2026-07-06T01:18:13.630373Z	    at ChildProcess.&lt;anonymous&gt; (/snapshot/dist/run-build.js)
2026-07-06T01:18:13.630738Z	    at Object.onceWrapper (node:events:652:26)
2026-07-06T01:18:13.630897Z	    at ChildProcess.emit (node:events:537:28)
2026-07-06T01:18:13.63146Z	    at ChildProcess._handle.onexit (node:internal/child_process:291:12)
2026-07-06T01:18:13.638586Z	Failed: build command exited with code: 1
2026-07-06T01:18:14.841415Z	Failed: error occurred while running build command
</code></pre>
<p>This is not a brand-new paper cut. Related reports have been around for years, including <a href="https://github.com/oven-sh/setup-bun/issues/70">oven-sh/setup-bun#70</a> and <a href="https://github.com/oven-sh/bun/issues/6305">oven-sh/bun#6305</a>. The short version: the install flow can trip over a remote download or rate limit problem, and Cloudflare Pages treats that as a failed build. Fair enough, but not very helpful when all you wanted was <code>bun install</code>. The funny part is that this is not Cloudflare rate-limiting Bun. It is Bun&#39;s own download side saying no, while <a href="https://bun.sh/">bun.sh</a> and <a href="https://bun.com/">bun.com</a> currently return <code>server: cloudflare</code>. Infrastructure irony, served with a <code>403</code>.</p>
<p>I also checked <a href="https://bun.sh/install">the current installer script</a>. On Linux, it is refreshingly boring: detect the platform and CPU, pick a target such as <code>linux-x64</code>, <code>linux-x64-baseline</code>, <code>linux-aarch64</code>, or a musl build for Alpine, then download <code>https://github.com/oven-sh/bun/releases/latest/download/bun-$target.zip</code>, unzip it into <code>$BUN_INSTALL/bin</code> or <code>~/.bun/bin</code>, and mark the binary executable. If <code>bun</code> is not already on <code>PATH</code>, it writes the usual <code>BUN_INSTALL</code> and <code>PATH</code> lines into the user&#39;s shell config when it can, or prints the commands to add manually. There is no package index, dependency solver, or anything especially magical here. It is mostly a small shell script pointing at GitHub Release assets, which makes the rate limit feel even stranger.</p>
<h2>2. Why npm install -g bun alone is not enough</h2>
<p>There is a common workaround: skip automatic dependency installation and run Bun yourself. For example, <a href="https://dt.in.th/BunCloudflarePages">dt.in.th documented</a> this pattern:</p>
<pre><code class="language-bash">npm install -g bun &amp;&amp; bun install &amp;&amp; bun run build
</code></pre>
<p>That gets close, but in my Cloudflare Pages tests it still used Cloudflare&#39;s older preinstalled Bun. The build log told on it:</p>
<pre><code class="language-log">2026-07-06T19:40:16.361085Z	Executing user command: npm install -g bun &amp;&amp; bun install &amp;&amp; bun run build
2026-07-06T19:40:33.293457Z
2026-07-06T19:40:33.30093Z	added 5 packages in 16s
2026-07-06T19:40:33.301321Z	npm warn allow-scripts 1 package has install scripts not yet covered by allowScripts:
2026-07-06T19:40:33.301456Z	npm warn allow-scripts   bun@1.3.14 (postinstall: node install.js)
2026-07-06T19:40:33.301535Z	npm warn allow-scripts
2026-07-06T19:40:33.301612Z	npm warn allow-scripts Run `npm approve-scripts --allow-scripts-pending` to review, or `npm approve-scripts &lt;pkg&gt;` to allow.
2026-07-06T19:40:33.966013Z	Reshimming asdf nodejs...
2026-07-06T19:40:43.03495Z	bun install v1.2.15 (df017990)
</code></pre>
<p>Two things happened there:</p>
<ol>
<li>npm installed the <code>bun</code> package, but its install script needed to be allowed.</li>
<li>The shell still resolved <code>bun</code> to Cloudflare&#39;s preinstalled/asdf-shimmed Bun before the npm-installed binary.</li>
</ol>
<p>The result is the worst kind of failure: it looks like you installed the new Bun, then the build quietly uses the old one. Very considerate. Also very wrong.</p>
<h2>3. The working Cloudflare Pages setup</h2>
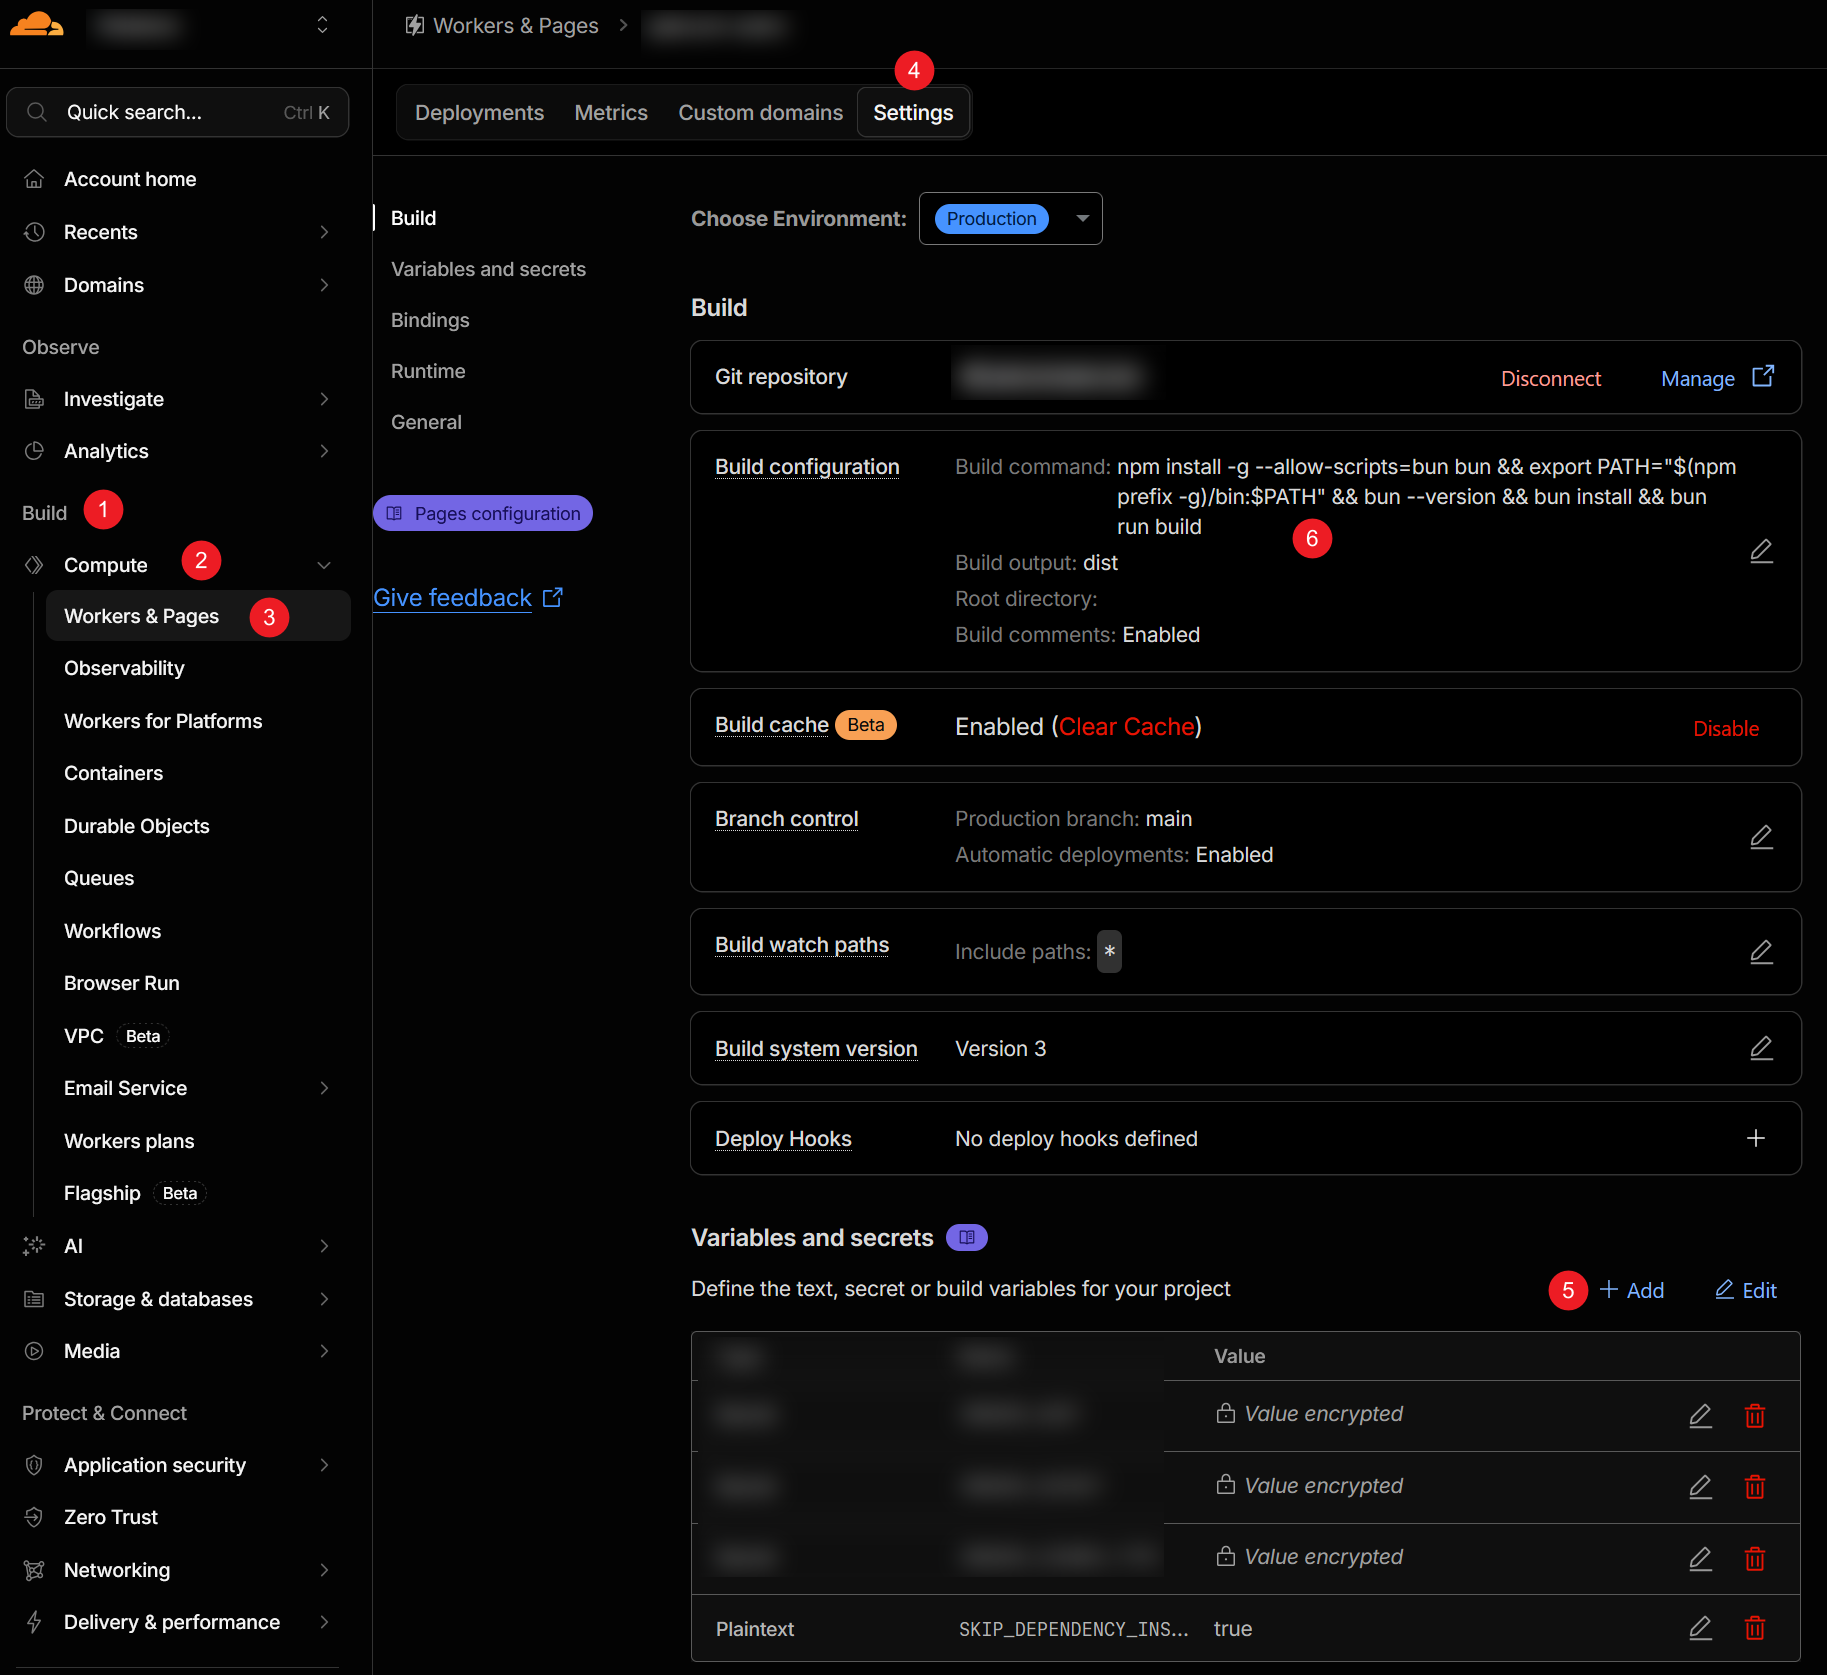
<p>First, disable automatic dependency installation so Cloudflare Pages does not run its own package manager step before your command.</p>
<p>In the Cloudflare Dashboard:</p>
<ol>
<li>Go to <strong>Build &gt; Compute &gt; Workers &amp; Pages</strong></li>
<li>Open your Pages project</li>
<li>Go to <strong>Settings &gt; Variables and secrets</strong></li>
<li>Add this build variable:</li>
</ol>
<p>Type: <code>Text</code></p>
<p>Variable name:</p>
<pre><code class="language-text">SKIP_DEPENDENCY_INSTALL
</code></pre>
<p>Value:</p>
<pre><code class="language-text">true
</code></pre>
<p>or</p>
<pre><code class="language-text">1
</code></pre>
<p>Cloudflare documents this variable in its <a href="https://developers.cloudflare.com/workers/ci-cd/builds/build-image/#skip-dependency-install">build image guide</a>: it disables automatic dependency installation so you can run a custom install command.</p>
<p>Then set your Pages build command to this:</p>
<pre><code class="language-bash">npm install -g --allow-scripts=bun bun &amp;&amp; export PATH=&quot;$(npm prefix -g)/bin:$PATH&quot; &amp;&amp; bun --version &amp;&amp; bun install &amp;&amp; bun run build
</code></pre>
<p>Screenshot:</p>
<p><img src="https://macdn.net/2026/07/06/m8h8q/image.webp" alt="Cloudflare Pages build settings with SKIP_DEPENDENCY_INSTALL and a custom Bun build command"></p>
<p>Here is what each part does:</p>
<ol>
<li><p><code>npm install -g --allow-scripts=bun bun</code></p>
<p> Installs Bun from npm and allows Bun&#39;s install script to run. Without that script, you can end up with the wrapper package but not the native Bun binary you actually need.</p>
</li>
<li><p><code>export PATH=&quot;$(npm prefix -g)/bin:$PATH&quot;</code></p>
<p> Puts npm&#39;s global binary directory at the front of <code>PATH</code>. This is the important bit. It makes the next <code>bun</code> command resolve to the npm-installed Bun instead of Cloudflare&#39;s default Bun <code>1.2.15</code>.</p>
</li>
<li><p><code>bun --version</code></p>
<p> Prints the Bun version in the build log. This is not decoration. It is the smoke alarm. If this does not print the version you expect, stop reading the rest of the log like it owes you money and fix the PATH first.</p>
</li>
<li><p><code>bun install &amp;&amp; bun run build</code></p>
<p> Installs dependencies and runs your normal build with the Bun binary you just verified.</p>
</li>
</ol>
<h2>4. What a good build log looks like</h2>
<p>With the command above, the build finally used Bun <code>1.3.14</code>:</p>
<pre><code class="language-log">2026-07-06T19:57:20.330572Z	SKIP_DEPENDENCY_INSTALL is present in environment. Skipping automatic dependency installation.
2026-07-06T19:57:20.330827Z	Executing user command: npm install -g --allow-scripts=bun bun &amp;&amp; export PATH=&quot;$(npm prefix -g)/bin:$PATH&quot; &amp;&amp; bun --version &amp;&amp; bun install &amp;&amp; bun run build
2026-07-06T19:57:26.270869Z	added 5 packages in 5s
2026-07-06T19:57:26.853104Z	Reshimming asdf nodejs...
2026-07-06T19:57:29.865184Z	1.3.14
2026-07-06T19:57:29.870732Z	bun install v1.3.14 (0d9b296a)
2026-07-06T19:58:07.304997Z	Success! Uploaded 38 files (2604 already uploaded) (1.85 sec)
2026-07-06T19:58:12.958621Z	Success: Assets published!
2026-07-06T19:58:13.849805Z	Success: Your site was deployed!
</code></pre>
<p>The key lines are:</p>
<pre><code class="language-log">1.3.14
bun install v1.3.14 (0d9b296a)
</code></pre>
<p>That proves both <code>bun --version</code> and <code>bun install</code> are using the same current Bun binary.</p>
<h2>5. Should you use latest or pin a version?</h2>
<p>For a personal site or a small project, installing the latest Bun during the Pages build may be convenient. You get current fixes without editing the Cloudflare project every time Bun ships.</p>
<p>For production builds where repeatability matters, pin the npm package instead:</p>
<pre><code class="language-bash">npm install -g --allow-scripts=bun bun@1.3.14 &amp;&amp; export PATH=&quot;$(npm prefix -g)/bin:$PATH&quot; &amp;&amp; bun --version &amp;&amp; bun install &amp;&amp; bun run build
</code></pre>
<p>That keeps the same PATH fix, but removes surprise upgrades from the equation. Surprise upgrades are fun in exactly one place: other people&#39;s staging environments.</p>
<h2>6. Final checklist</h2>
<p>Use this setup when you want Cloudflare Pages to build with the current Bun instead of the preinstalled default:</p>
<ol>
<li><p>Add <code>SKIP_DEPENDENCY_INSTALL=true</code> in Pages variables and secrets.</p>
</li>
<li><p>Use this build command:</p>
<pre><code class="language-bash">npm install -g --allow-scripts=bun bun &amp;&amp; export PATH=&quot;$(npm prefix -g)/bin:$PATH&quot; &amp;&amp; bun --version &amp;&amp; bun install &amp;&amp; bun run build
</code></pre>
</li>
<li><p>Check the build log for the expected version after <code>bun --version</code>.</p>
</li>
<li><p>Check that <code>bun install</code> reports the same version.</p>
</li>
</ol>
<p>If Bun or Cloudflare fixes the issue later, this workaround can become shorter. Bun can fix the rate limit behavior on its own download side. Cloudflare can also avoid Bun&#39;s installer script for a managed build runtime and fetch the versioned or latest GitHub Release asset directly. Neither option requires a new theory of computing. Until then, the build command above gives you the latest Bun without asking Cloudflare&#39;s preinstalled runtime to kindly stop standing in the doorway.</p>
]]></content>
        <author>
            <name>Xiufeng Guo</name>
            <email>i@m.ac</email>
            <uri>https://m.ac</uri>
        </author>
        <published>2026-07-06T21:56:42.000Z</published>
    </entry>
    <entry>
        <title type="html"><![CDATA[Install latest Nginx, MariaDB, and PHP on Debian and Ubuntu]]></title>
        <id>https://m.ac/install-nginx-mariadb-php-debian-ubuntu/</id>
        <link href="https://m.ac/install-nginx-mariadb-php-debian-ubuntu/"/>
        <updated>2026-07-06T00:00:00.000Z</updated>
        <summary type="html"><![CDATA[Install latest Nginx, MariaDB, and PHP packages for a LEMP stack on Debian and Ubuntu.]]></summary>
        <content type="html"><![CDATA[<p>This guide installs latest Nginx, MariaDB, and PHP packages for a LEMP stack on Debian and Ubuntu.</p>
<p>Updated July 6, 2026: PHP 8.5 and MariaDB 12.3 LTS.</p>
<h2>Introduction</h2>
<p>When Debian prepares a new stable release, it uses a <a href="https://release.debian.org/trixie/freeze_policy.html">freeze policy</a>. Package versions are locked near release time, and they usually stay on that major version for the life of the release. Some packages get newer builds through <a href="https://backports.debian.org/">Debian backports</a>, but many do not.</p>
<p>That is fine for a lot of servers. For web apps that care about newer Nginx, MariaDB, or PHP features, it can be annoying. This guide uses trusted third-party repositories for those components while keeping the rest of the system on Debian or Ubuntu packages.</p>
<h2>1. Prerequisites</h2>
<p>Use <a href="https://www.debian.org/releases/"><strong>Debian Stable</strong></a> or <strong>oldstable</strong>. Debian <strong>sid</strong> is not supported here. On Ubuntu, use an <a href="https://releases.ubuntu.com/"><strong>Ubuntu LTS</strong></a> release rather than an interim release.</p>
<p>The commands below use <code>sudo</code>. If you prefer a root shell, run <code>sudo -i</code> first and drop <code>sudo</code> from the commands.</p>
<p>Update the system and install the tools needed to add APT repositories:</p>
<pre><code class="language-bash">sudo apt update -y
sudo apt upgrade -y
sudo apt full-upgrade -y
sudo apt install curl vim wget gnupg dpkg apt-transport-https lsb-release ca-certificates -y
</code></pre>
<h2>2. Install Nginx</h2>
<p><a href="https://n.wtf/"><strong>N.WTF</strong></a> syncs official Nginx source and packaging, then builds it with a current OpenSSL version.</p>
<h3>2.1 Add GPG key</h3>
<pre><code class="language-bash">curl -sS https://n.wtf/public.key | sudo gpg --dearmor -o /usr/share/keyrings/n.wtf.gpg
</code></pre>
<h3>2.2 Add repository</h3>
<pre><code class="language-bash">echo &quot;deb [arch=$(dpkg --print-architecture) signed-by=/usr/share/keyrings/n.wtf.gpg] https://mirror-cdn.xtom.com/sb/nginx/ $(lsb_release -sc) main&quot; | sudo tee /etc/apt/sources.list.d/n.wtf.list
</code></pre>
<p>On Debian, <a href="https://m.ac/use-extrepo-add-third-party-repositories-debian/">extrepo</a> can add the same repository:</p>
<pre><code class="language-bash">sudo apt install extrepo -y
sudo extrepo enable n.wtf
</code></pre>
<h3>2.3 Update system and install Nginx</h3>
<pre><code class="language-bash">sudo apt update
sudo apt install nginx-extras -y
</code></pre>
<p>Check that Nginx was installed:</p>
<pre><code class="language-bash">root@debian ~ # nginx -v
nginx version: nginx-n.wtf/1.31.2
</code></pre>
<h2>3. Install PHP</h2>
<p>Use PHP packages from <a href="https://deb.sury.org/">Ondřej Surý</a>, who maintains widely used PHP builds for Debian and Ubuntu.</p>
<h3>3.1 Add GPG key and repository</h3>
<p>Debian:</p>
<pre><code class="language-bash">sudo wget -O /usr/share/keyrings/deb.sury.org-php.gpg https://packages.sury.org/php/apt.gpg
echo &quot;deb [arch=$(dpkg --print-architecture) signed-by=/usr/share/keyrings/deb.sury.org-php.gpg] https://packages.sury.org/php/ $(lsb_release -sc) main&quot; | sudo tee /etc/apt/sources.list.d/php.list
</code></pre>
<p>On Debian, you can use extrepo instead:</p>
<pre><code class="language-bash">sudo extrepo enable sury
</code></pre>
<p>On Ubuntu, use Ondřej Surý&#39;s PPA:</p>
<pre><code class="language-bash">sudo add-apt-repository ppa:ondrej/php
</code></pre>
<h3>3.2 Install specific PHP version</h3>
<p>Avoid installing broad <code>php-*</code> packages directly. They may pull a PHP version your application does not expect.</p>
<p>After adding the repository, update APT:</p>
<pre><code class="language-bash">sudo apt update
</code></pre>
<p>Then install one specific PHP version and the extensions you need. This extension set works for a typical WordPress site:</p>
<p>Install PHP 8.5 (Opcache is enabled by default in PHP 8.5):</p>
<pre><code class="language-bash">sudo apt install php8.5-{fpm,cli,mysql,curl,gd,mbstring,xml,zip,imap,soap,gmp,bcmath} -y
</code></pre>
<p>Install PHP 8.4</p>
<pre><code class="language-bash">sudo apt install php8.4-{fpm,cli,mysql,curl,gd,mbstring,xml,zip,imap,opcache,soap,gmp,bcmath} -y
</code></pre>
<p>Install PHP 8.3</p>
<pre><code class="language-bash">sudo apt install php8.3-{fpm,cli,mysql,curl,gd,mbstring,xml,zip,imap,opcache,soap,gmp,bcmath} -y
</code></pre>
<p>Install PHP 8.2</p>
<pre><code class="language-bash">sudo apt install php8.2-{fpm,cli,mysql,curl,gd,mbstring,xml,zip,imap,opcache,soap,gmp,bcmath} -y
</code></pre>
<p>The PHP versions below are EOL and are no longer officially supported.</p>
<p>Install PHP 8.1</p>
<pre><code class="language-bash">sudo apt install php8.1-{fpm,cli,mysql,curl,gd,mbstring,xml,zip,imap,opcache,soap,gmp,bcmath} -y
</code></pre>
<p>Install PHP 8.0</p>
<pre><code class="language-bash">sudo apt install php8.0-{fpm,cli,mysql,curl,gd,mbstring,xml,zip,imap,opcache,soap,gmp,bcmath} -y
</code></pre>
<p>Install PHP 7.4</p>
<pre><code class="language-bash">sudo apt install php7.4-{fpm,cli,mysql,curl,gd,mbstring,xml,zip,imap,opcache,soap,gmp,bcmath} -y
</code></pre>
<p>Install PHP 7.3</p>
<pre><code class="language-bash">sudo apt install php7.3-{fpm,cli,mysql,curl,gd,mbstring,xml,zip,imap,opcache,soap,gmp,bcmath} -y
</code></pre>
<p>Install PHP 7.2 (mcrypt was deprecated in PHP 7.1 and removed from core in 7.2)</p>
<pre><code class="language-bash">sudo apt install php7.2-{fpm,cli,mysql,curl,gd,mbstring,xml,zip,imap,opcache,soap,gmp,bcmath} -y
</code></pre>
<p>Install PHP 7.1</p>
<pre><code class="language-bash">sudo apt install php7.1-{fpm,cli,mysql,curl,gd,mbstring,mcrypt,xml,zip,imap,opcache,soap,gmp,bcmath} -y
</code></pre>
<p>Install PHP 7.0</p>
<pre><code class="language-bash">sudo apt install php7.0-{fpm,cli,mysql,curl,gd,mbstring,mcrypt,xml,zip,imap,opcache,soap,gmp,bcmath} -y
</code></pre>
<p>Install PHP 5.6</p>
<pre><code class="language-bash">sudo apt install php5.6-{fpm,cli,mysql,curl,gd,mbstring,mcrypt,xml,zip,imap,opcache,soap,gmp,bcmath} -y
</code></pre>
<p>Search for any other PHP extensions your application needs:</p>
<pre><code>apt search php8.5-*
</code></pre>
<p>Next, adjust the matching <code>php.ini</code> file:</p>
<ul>
<li>For <strong>PHP 8.5</strong>, edit <code>/etc/php/8.5/fpm/php.ini</code>.</li>
<li>For <strong>PHP 7.4</strong>, edit <code>/etc/php/7.4/fpm/php.ini</code>.</li>
<li>For another version, change the version number in the path.</li>
</ul>
<p>For PHP-FPM, disable <code>cgi.fix_pathinfo</code>:</p>
<p>This avoids an old class of path handling problems when Nginx passes requests to PHP-FPM.</p>
<pre><code class="language-bash">sudo sed -i &#39;s/;cgi.fix_pathinfo=1/cgi.fix_pathinfo=0/&#39; /etc/php/8.5/fpm/php.ini 
</code></pre>
<p>Adjust upload and post limits:</p>
<p>Change <code>upload_max_filesize</code> and <code>post_max_size</code> if your application needs larger uploads:</p>
<pre><code class="language-bash">sudo sed -i &#39;s/upload_max_filesize = 2M/upload_max_filesize = 10M/&#39; /etc/php/8.5/fpm/php.ini
sudo sed -i &#39;s/post_max_size = 8M/post_max_size = 10M/&#39; /etc/php/8.5/fpm/php.ini
</code></pre>
<p>If you install multiple PHP versions, choose the default CLI version with:</p>
<pre><code class="language-bash">sudo update-alternatives --config php
</code></pre>
<p>Restart PHP-FPM after editing its configuration:</p>
<pre><code class="language-bash">sudo systemctl restart php8.5-fpm
</code></pre>
<p>Now add an Nginx site configuration.</p>
<p>Create a new configuration file for your site under <code>/etc/nginx/sites-available/</code>:</p>
<pre><code class="language-bash">sudo bash -c &#39;cat &gt; /etc/nginx/sites-available/example.com.conf &lt;&lt; EOF
server {
        listen 80;
        listen [::]:80;

# Web root, I recommend using /var/www
        root /var/www/example.com;
        index index.php index.html index.htm;

# Replace example.com with your domain name
        server_name example.com;

        location / {
            try_files \$uri \$uri/ =404;
        }

# Enable PHP 8.5-FPM. For PHP 7.4, use fastcgi_pass unix:/run/php/php7.4-fpm.sock;
        location ~ \.php$ {
            include snippets/fastcgi-php.conf;
            fastcgi_pass unix:/run/php/php8.5-fpm.sock;
        }
}
EOF&#39;
</code></pre>
<p>Link it into <code>/etc/nginx/sites-enabled</code>:</p>
<pre><code class="language-bash">sudo ln -s /etc/nginx/sites-available/example.com.conf /etc/nginx/sites-enabled/example.com.conf
</code></pre>
<p>Test the configuration and reload Nginx:</p>
<pre><code class="language-bash">sudo nginx -t
sudo nginx -s reload
</code></pre>
<p>Create <code>/var/www/example.com</code> and make <code>www-data</code> the owner:</p>
<pre><code class="language-bash">sudo mkdir -p /var/www/example.com
sudo chown www-data:www-data /var/www/example.com -R
</code></pre>
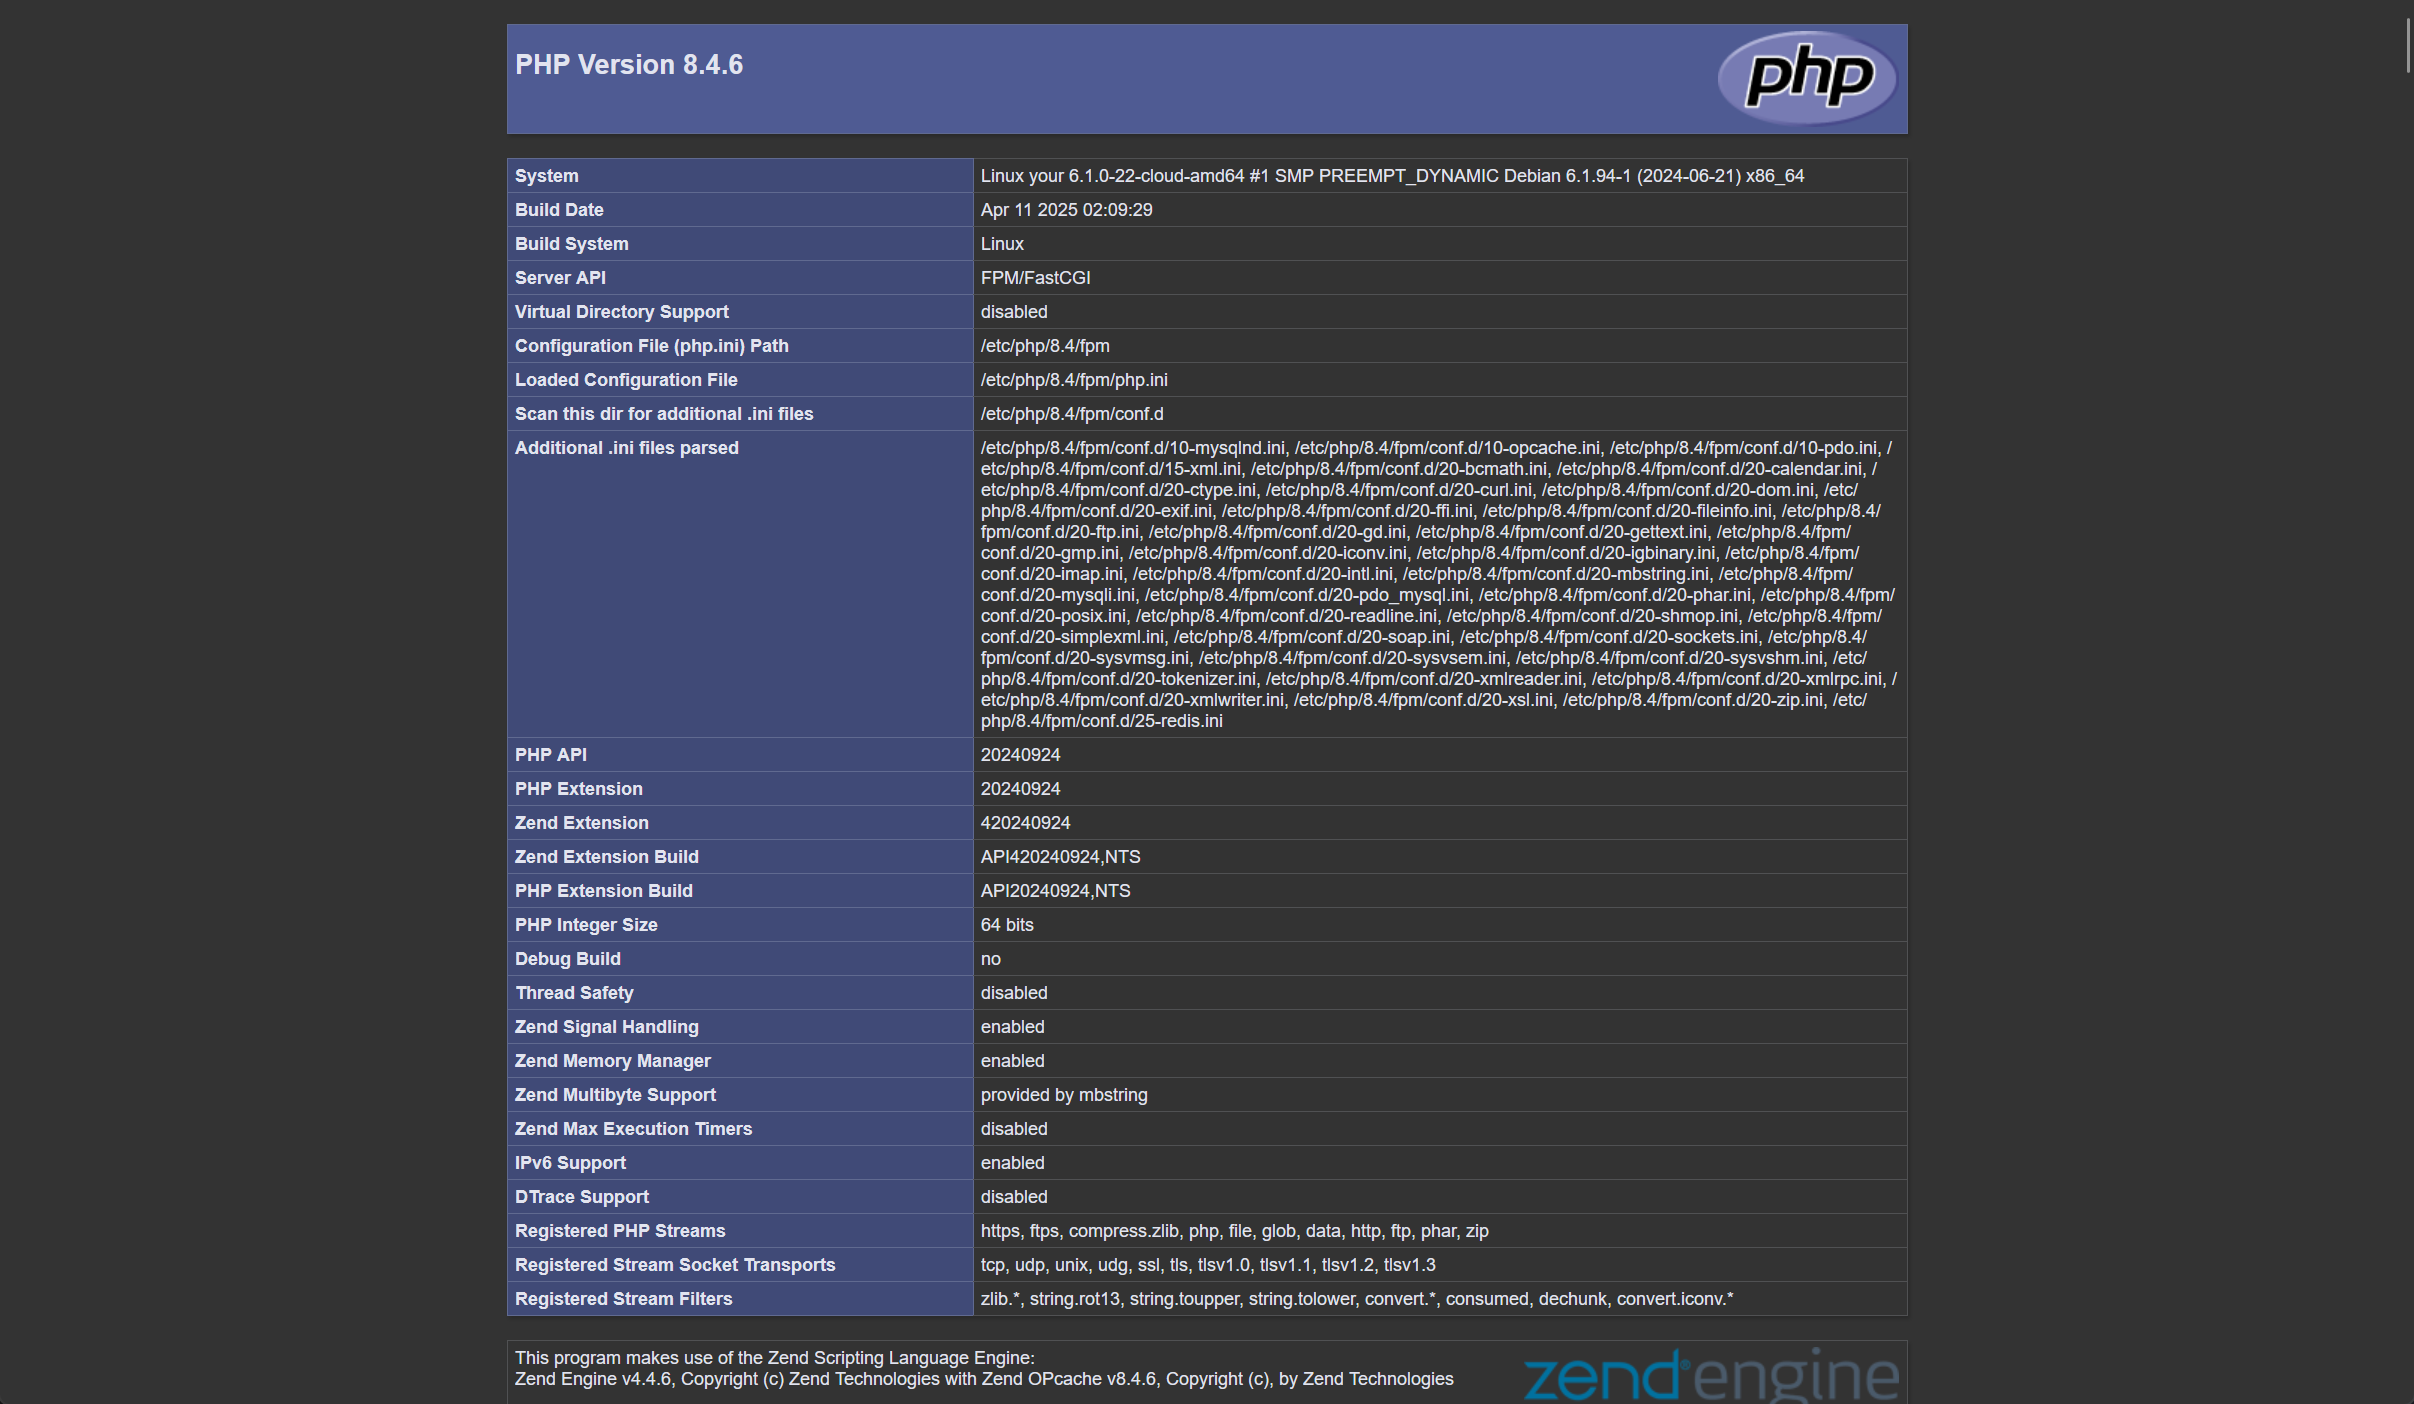
<p>Create <code>phpinfo.php</code> to test PHP:</p>
<pre><code class="language-bash">sudo -u www-data bash -c &#39;cat &gt; /var/www/example.com/phpinfo.php &lt;&lt; EOF
&lt;?php phpinfo(); ?&gt;
EOF&#39;
</code></pre>
<p>Visit <code>http://example.com/phpinfo.php</code> after the <strong>A</strong> or <strong>AAAA</strong> DNS records for <code>example.com</code> point to this server.</p>
<p><a href="https://macdn.net/2026/07/07/m42tm/php8-4-phpinfo.webp"><img src="https://macdn.net/2026/07/07/m42tm/php8-4-phpinfo.webp" alt="phpinfo page showing PHP 8.4 running with FPM/FastCGI on Debian"></a></p>
<h2>4. Install MariaDB</h2>
<p>This setup uses MariaDB instead of MySQL for historical and licensing reasons.</p>
<h3>4.1 Add GPG key</h3>
<pre><code class="language-bash">curl -sSL https://supplychain.mariadb.com/MariaDB-Server-GPG-KEY | sudo gpg --dearmor -o /usr/share/keyrings/mariadb.gpg
</code></pre>
<h3>4.2 Add repository</h3>
<p>Debian:</p>
<pre><code class="language-bash">echo &quot;deb [arch=$(dpkg --print-architecture) signed-by=/usr/share/keyrings/mariadb.gpg] https://dlm.mariadb.com/repo/mariadb-server/12.3/repo/debian $(lsb_release -sc) main&quot; | sudo tee /etc/apt/sources.list.d/mariadb.list
</code></pre>
<p>Or use extrepo:</p>
<pre><code class="language-bash">sudo extrepo enable mariadb-12.3
</code></pre>
<p>Ubuntu:</p>
<pre><code class="language-bash">echo &quot;deb [arch=$(dpkg --print-architecture) signed-by=/usr/share/keyrings/mariadb.gpg] https://dlm.mariadb.com/repo/mariadb-server/12.3/repo/ubuntu $(lsb_release -sc) main&quot; | sudo tee /etc/apt/sources.list.d/mariadb.list
</code></pre>
<h3>4.3 Install MariaDB</h3>
<pre><code class="language-bash">sudo apt update
sudo apt install mariadb-server mariadb-client -y
</code></pre>
<p>After installing MariaDB, run <code>sudo mariadb-secure-installation</code> if you want to set a root password and apply the usual basic hardening prompts.</p>
<h3>4.4 Create database and test</h3>
<p>Before creating a database, generate a random password. The <code>openssl</code> command works well:</p>
<pre><code class="language-bash">openssl rand -hex 16
</code></pre>
<p>Or</p>
<pre><code class="language-bash">openssl rand -base64 16
</code></pre>
<p>Or install <code>pwgen</code>:</p>
<pre><code class="language-bash">sudo apt install pwgen -y
pwgen 16
</code></pre>
<p>Log in to MariaDB as <code>root</code>. By default, local root login uses Unix socket authentication, so you do not need a MariaDB root password:</p>
<pre><code class="language-bash">sudo mariadb
</code></pre>
<p>Create an example database called <code>example_database</code>:</p>
<pre><code class="language-sql">CREATE DATABASE example_database DEFAULT CHARACTER SET utf8mb4 COLLATE utf8mb4_unicode_ci;
</code></pre>
<p>Create an example user <code>example_user</code> and grant permissions:</p>
<pre><code class="language-sql">GRANT ALL ON example_database.* TO &#39;example_user&#39;@&#39;localhost&#39; IDENTIFIED BY &#39;Your_Powerful_Strong_Password&#39;;
FLUSH PRIVILEGES;
</code></pre>
<p>Exit MariaDB:</p>
<pre><code class="language-sql">EXIT;
</code></pre>
<p>Create <code>mysql-test.php</code> in <code>/var/www/example.com</code>:</p>
<pre><code class="language-bash">sudo -u www-data tee /var/www/example.com/mysql-test.php &gt; /dev/null &lt;&lt; &#39;EOF&#39;
&lt;?php
$dbname = &#39;example_database&#39;;    //MySQL database
$dbuser = &#39;example_user&#39;;   //MySQL user
$dbpass = &#39;Your_Powerful_Strong_Password&#39;;
$dbhost = &#39;localhost&#39;;  //use localhost if you install locally
$link = mysqli_connect($dbhost, $dbuser, $dbpass) or die(&quot;Unable to Connect to &#39;$dbhost&#39;&quot;);
mysqli_select_db($link, $dbname) or die(&quot;Could not open the db &#39;$dbname&#39;&quot;);
$test_query = &quot;SHOW TABLES FROM $dbname&quot;;
$result = mysqli_query($link, $test_query);
$tblCnt = 0;
while($tbl = mysqli_fetch_array($result)) {
  $tblCnt++;
  #echo $tbl[0].&quot;&lt;br /&gt;\n&quot;;
}
if (!$tblCnt) {
  echo &quot;MySQL is working fine. There are no tables.&quot;;
} else {
  echo &quot;MySQL is working fine. There are $tblCnt tables.&quot;;
}
?&gt;
EOF
</code></pre>
<p>The quoted <code>&#39;EOF&#39;</code> delimiter keeps the shell from touching anything inside, so the PHP lands on disk exactly as written.</p>
<p>Visit <code>http://example.com/mysql-test.php</code> to verify the database connection.</p>
<p>If the page shows <code>MySQL is working fine. There are no tables.</code>, PHP can connect to MariaDB.</p>
<p>Once both tests pass, delete the test files. <code>mysql-test.php</code> has your database password in it, and neither belongs on a public web root:</p>
<pre><code class="language-bash">sudo rm /var/www/example.com/phpinfo.php /var/www/example.com/mysql-test.php
</code></pre>
]]></content>
        <author>
            <name>Xiufeng Guo</name>
            <email>i@m.ac</email>
            <uri>https://m.ac</uri>
        </author>
        <published>2025-04-27T17:52:54.000Z</published>
    </entry>
    <entry>
        <title type="html"><![CDATA[Install Ghost on Docker]]></title>
        <id>https://m.ac/install-ghost-on-docker/</id>
        <link href="https://m.ac/install-ghost-on-docker/"/>
        <updated>2026-01-15T19:05:16.000Z</updated>
        <summary type="html"><![CDATA[Run Ghost with Docker Compose, MySQL, Watchtower, and either Nginx or Caddy as the public reverse proxy.]]></summary>
        <content type="html"><![CDATA[<h2>Introduction</h2>
<h3>What is Ghost?</h3>
<p><a href="https://ghost.org/">Ghost</a> is an open-source publishing platform for blogs, newsletters, and paid memberships. It gives you the editor, admin panel, email tooling, and subscription features in one place.</p>
<p>This tutorial runs Ghost on Docker with MySQL, then puts it behind either Nginx or Caddy.</p>
<hr>
<h2>1. Prerequisites</h2>
<p>Make sure you have installed <a href="https://www.debian.org/releases/?ref=m.ac"><strong>Debian Stable</strong></a> (either <strong>oldstable</strong> or <strong>stable</strong> releases, <strong>sid</strong> is not supported) or <a href="https://releases.ubuntu.com/?ref=m.ac"><strong>Ubuntu LTS</strong></a> (Interim releases not supported).</p>
<p>The commands below use <code>sudo</code>. If you prefer a root shell, run <code>sudo -i</code> first and drop <code>sudo</code> from the commands.</p>
<p>The <code>docker</code> commands in this guide are not prefixed with <code>sudo</code>: add your user to the <code>docker</code> group (<code>sudo usermod -aG docker $USER</code>, then log out and back in), or prefix the <code>docker</code> commands with <code>sudo</code> yourself.</p>
<p>Install Docker and Docker Compose by following the instructions <a href="https://m.ac/install-docker-debian-ubuntu/">in this article</a>.</p>
<p>You may need a Mailgun account to send emails and newsletters. You can sign up <a href="https://signup.mailgun.com/new/signup">here</a>.</p>
<hr>
<h2>2. Create a Docker Compose file</h2>
<p>Create a file named <code>compose.yaml</code> at <code>/opt/compose.yaml</code>:</p>
<pre><code class="language-bash">cd /opt

echo &#39;name: ghost

services:
  ghost:
    image: ghost:6-alpine
    container_name: ghost
    restart: always
    ports:
      - 127.0.0.1:2368:2368
    environment:
      TZ: &quot;UTC&quot;
      database__client: mysql
      database__connection__host: ghost_database
      database__connection__user: ghost_user
      database__connection__password: YourRandomMySQLPassword
      database__connection__database: ghost_database
      mail__transport: smtp
      mail__from: &quot;Your Name &lt;noreply@example.com&gt;&quot;
      mail__options__service: Mailgun
      mail__options__host: smtp.mailgun.org
      mail__options__port: 465
      mail__options__auth__user: YourMailgunEmailUsername
      mail__options__auth__pass: YourMailgunEmailPassword
      mail__options__secure: true
      url: https://example.com/
    volumes:
      - ./data/ghost:/var/lib/ghost/content
    networks:
      - ghost-network

  ghost_database:
    image: mysql:8
    container_name: ghost_database
    restart: always
    environment:
      MYSQL_ROOT_PASSWORD: YourRandomMySQLRootPassword
      MYSQL_DATABASE: ghost_database
      MYSQL_USER: ghost_user
      MYSQL_PASSWORD: YourRandomMySQLPassword
    volumes:
      - ./data/mysql:/var/lib/mysql
    networks:
      - ghost-network

  watchtower:
    image: nickfedor/watchtower:latest
    container_name: watchtower
    restart: always
    volumes:
      - /var/run/docker.sock:/var/run/docker.sock
    environment:
      - WATCHTOWER_CLEANUP=true
      - WATCHTOWER_POLL_INTERVAL=86400
    networks:
      - ghost-network

networks:
  ghost-network:
    name: ghost-network
&#39; | sudo tee ./compose.yaml
</code></pre>
<blockquote>
<p>Replace the Ghost environment settings with your own values.</p>
</blockquote>
<p>Pull the images and start the containers:</p>
<pre><code class="language-bash">docker compose pull
docker compose up -d
</code></pre>
<p>Use <code>docker ps</code> to check that the containers are running:</p>
<pre><code class="language-bash"># docker ps
CONTAINER ID   IMAGE                          COMMAND                  CREATED         STATUS                            PORTS                      NAMES
bd0cb912685f   ghost:5-alpine                 &quot;docker-entrypoint.s…&quot;   3 seconds ago   Up Less than a second             127.0.0.1:2368-&gt;2368/tcp   ghost
eb058d47d520   mysql:lts                      &quot;docker-entrypoint.s…&quot;   3 seconds ago   Up 2 seconds                      3306/tcp, 33060/tcp        ghost_database
b96d0acfb0f9   nickfedor/watchtower:latest     &quot;/watchtower&quot;            3 seconds ago   Up 2 seconds (health: starting)   8080/tcp                   watchtower
</code></pre>
<p>Use <code>docker logs ghost</code> if you want to check Ghost&#39;s startup logs:</p>
<pre><code class="language-bash"># docker logs ghost
...........
[2025-05-05 19:06:38] INFO Database is in a ready state.
[2025-05-05 19:06:38] INFO Ghost database ready in 5.036s
[2025-05-05 19:06:39] INFO Invalidating assets for regeneration
[2025-05-05 19:06:39] INFO Adding offloaded job to the inline job queue
[2025-05-05 19:06:39] INFO Scheduling job mentions-email-report at 13 33 * * * *. Next run on: Mon May 05 2025 19:33:13 GMT+0000 (Coordinated Universal Time)
[2025-05-05 19:06:39] INFO Adding one-off job to inlineQueue with current length = 0 called &#39;members-migrations&#39;
[2025-05-05 19:06:39] INFO Stripe not configured - skipping migrations
[2025-05-05 19:06:40] INFO URL Service ready in 1156ms
[2025-05-05 19:06:40] INFO Adding offloaded job to the inline job queue
[2025-05-05 19:06:40] INFO Scheduling job clean-expired-comped at 59 13 3 * * *. Next run on: Tue May 06 2025 03:13:59 GMT+0000 (Coordinated Universal Time)
[2025-05-05 19:06:40] INFO Adding offloaded job to the inline job queue
[2025-05-05 19:06:40] INFO Scheduling job clean-tokens at 35 51 0 * * *. Next run on: Tue May 06 2025 00:51:35 GMT+0000 (Coordinated Universal Time)
[2025-05-05 19:06:40] INFO Ghost booted in 6.953s
[2025-05-05 19:06:40] INFO Adding offloaded job to the inline job queue
[2025-05-05 19:06:40] INFO Scheduling job update-check at 12 0 17 * * *. Next run on: Tue May 06 2025 17:00:12 GMT+0000 (Coordinated Universal Time)
[2025-05-05 19:06:40] INFO Running milestone emails job on Tue May 06 2025 19:06:40 GMT+0000 (Coordinated Universal Time)
</code></pre>
<p>Ghost is now listening on <code>127.0.0.1:2368</code>. Add a reverse proxy so the site is reachable from the public internet.</p>
<hr>
<h2>3. Set up an Nginx reverse proxy</h2>
<p>Install Nginx from <a href="https://n.wtf/install/">N.WTF</a>, then install the package:</p>
<pre><code class="language-bash">sudo apt install nginx-extras -y
</code></pre>
<p>Create a configuration file at <code>/etc/nginx/sites-available/example.com</code>:</p>
<pre><code class="language-bash">sudo bash -c &#39;cat &gt; /etc/nginx/sites-available/example.com &lt;&lt; &quot;EOF&quot;
upstream ghost {
  server 127.0.0.1:2368;
}

server {
  listen 443 ssl;
  listen [::]:443 ssl;
  listen 443 quic;
  listen [::]:443 quic;

  server_name example.com;

  access_log /var/log/nginx/example.com.access.log;
  error_log /var/log/nginx/example.com.error.log;

  add_header Alt-Svc &#39;&quot;&#39;&quot;&#39;h3=&quot;:443&quot;; ma=86400&#39;&quot;&#39;&quot;&#39;;
  add_header Strict-Transport-Security &quot;max-age=63072000; includeSubDomains; preload&quot;; 
  add_header X-Frame-Options SAMEORIGIN;
  add_header X-Content-Type-Options nosniff;
  add_header Referrer-Policy &quot;strict-origin-when-cross-origin&quot;;

  location / {
    proxy_set_header X-Real-IP $remote_addr;
    proxy_set_header X-Forwarded-For $proxy_add_x_forwarded_for;
    proxy_set_header Host $host;
    proxy_set_header X-NginX-Proxy true;
    proxy_http_version 1.1;
    proxy_set_header Upgrade $http_upgrade;
    proxy_set_header Connection &quot;&quot;;
    proxy_redirect off;
    proxy_set_header        X-Forwarded-Proto $scheme;
    proxy_connect_timeout       300;
    proxy_send_timeout          300;
    proxy_read_timeout          300;
    send_timeout                300;
    proxy_pass http://ghost;
    proxy_hide_header X-powered-by;
  }

  ssl_protocols TLSv1.3;
  ssl_ecdh_curve X25519:prime256v1:secp384r1;
  ssl_prefer_server_ciphers off;

  ssl_certificate /etc/nginx/ssl/example.com.crt;
  ssl_certificate_key /etc/nginx/ssl/example.com.key;
}
EOF&#39;

sudo ln -s /etc/nginx/sites-available/example.com /etc/nginx/sites-enabled/example.com
</code></pre>
<blockquote>
<p>Replace <code>example.com</code> and the SSL certificate paths with your own domain and certificate files.</p>
</blockquote>
<p>This config assumes the certificates already exist under <code>/etc/nginx/ssl</code>. To issue them, see <a href="https://m.ac/nginx-acme-auto-ssl-debian-ubuntu/">How to Use nginx-acme on Debian/Ubuntu to Auto-Issue Let&#39;s Encrypt SSL for NGINX</a> or <a href="https://m.ac/letsencrypt-ip-certificate/">How to Get Let&#39;s Encrypt SSL Certificates for IP Addresses with acme.sh</a>.</p>
<p>Test the Nginx configuration and reload the service:</p>
<pre><code class="language-bash">sudo nginx -t
sudo nginx -s reload
</code></pre>
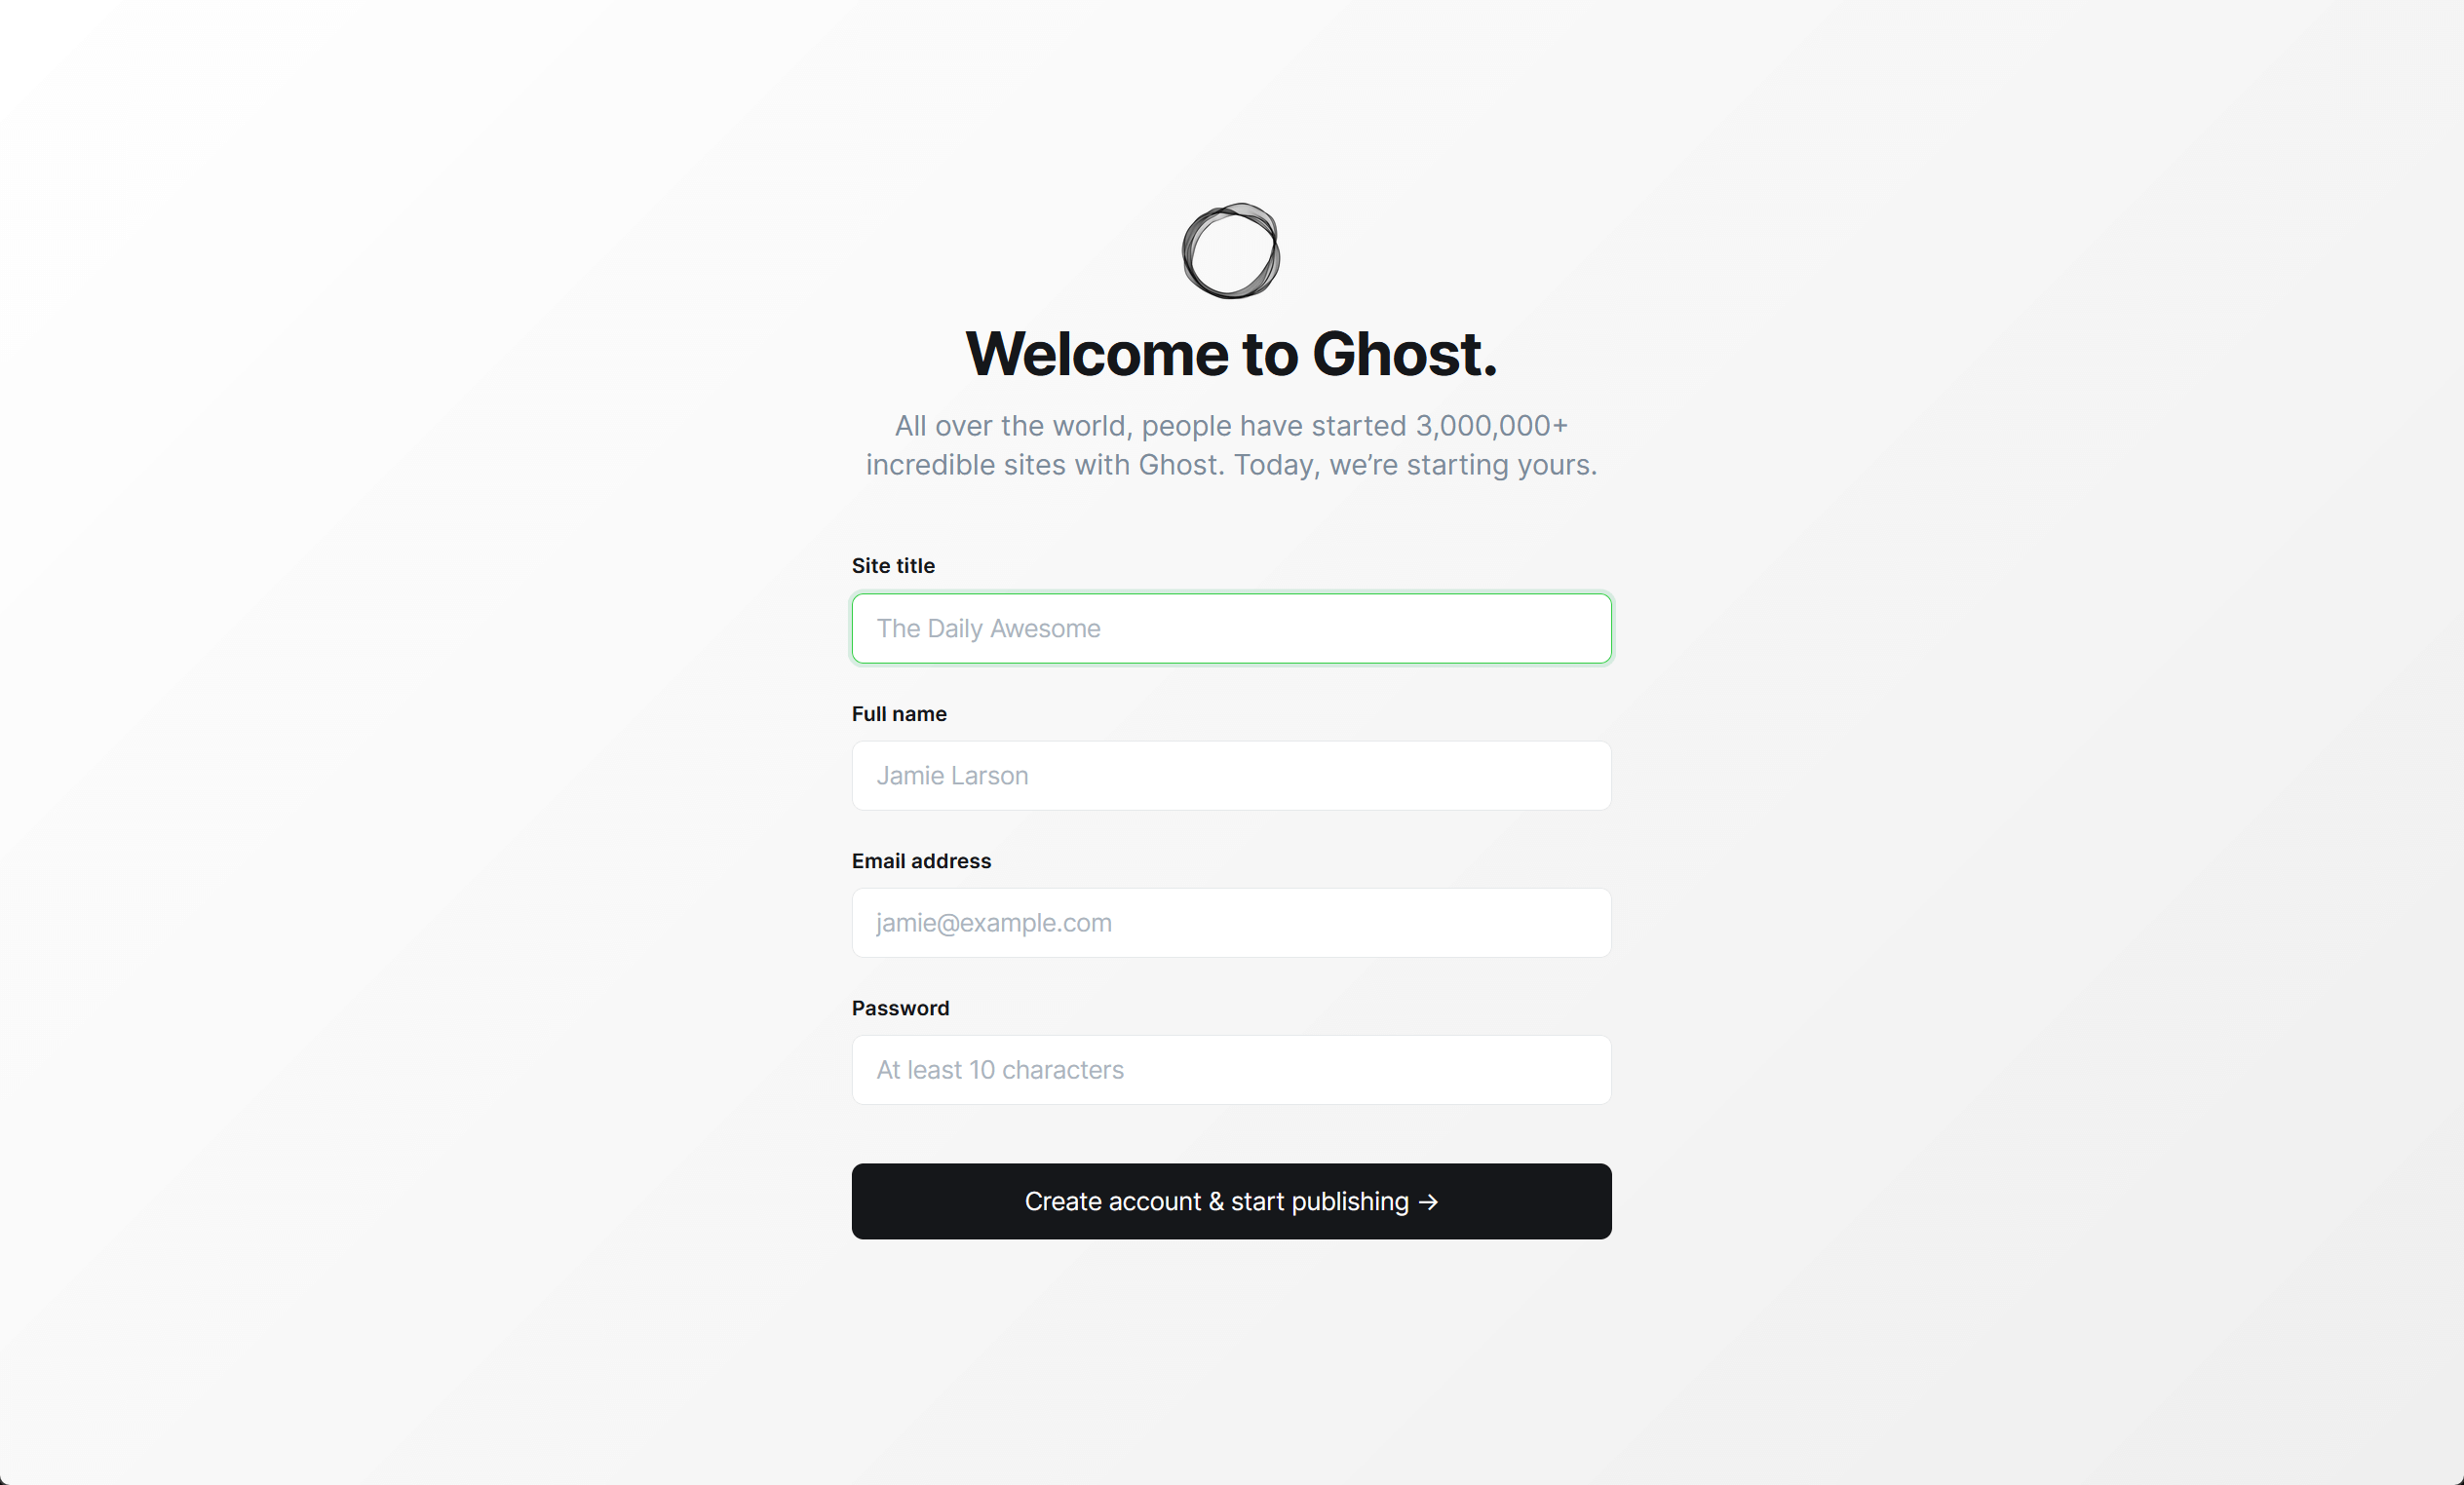
<p>Visit <code>https://example.com/ghost/</code> in your browser to open the Ghost admin screen.</p>
<p><img src="https://macdn.net/2026/07/07/3ym9d/ghost-admin.png" alt="Ghost admin welcome screen after a fresh Docker install"></p>
<hr>
<h2>4. Set up Caddy as a reverse proxy</h2>
<p>If you do not want to manage certificates by hand, use Caddy instead of Nginx. It is less ceremony, which is nice when you would rather blog than negotiate TLS.</p>
<p><a href="https://caddyserver.com/">Caddy</a> is an extensible, cross-platform, open-source web server written in Go. It requests and renews TLS certificates automatically.</p>
<p>Add the following lines to your Docker Compose YAML file:</p>
<pre><code class="language-yaml">  caddy:
    image: caddy:alpine
    container_name: caddy
    restart: always
    ports:
      - &quot;80:80/tcp&quot;
      - &quot;443:443/tcp&quot;
      - &quot;443:443/udp&quot;
    volumes:
      - ./caddy/etc/caddy:/etc/caddy
      - ./caddy/data:/data
      - ./caddy/config:/config
      - ./caddy/srv:/srv
    networks:
      - ghost-network
</code></pre>
<p>Or replace the Compose file with this full version:</p>
<pre><code class="language-bash">cd /opt

echo &#39;name: ghost

services:
  ghost:
    image: ghost:6-alpine
    container_name: ghost
    restart: always
    ports:
      - 127.0.0.1:2368:2368
    environment:
      TZ: &quot;UTC&quot;
      database__client: mysql
      database__connection__host: ghost_database
      database__connection__user: ghost_user
      database__connection__password: YourRandomMySQLPassword
      database__connection__database: ghost_database
      mail__transport: smtp
      mail__from: &quot;Your Name &lt;noreply@example.com&gt;&quot;
      mail__options__service: Mailgun
      mail__options__host: smtp.mailgun.org
      mail__options__port: 465
      mail__options__auth__user: YourMailgunEmailUsername
      mail__options__auth__pass: YourMailgunEmailPassword
      mail__options__secure: true
      url: https://example.com/
    volumes:
      - ./data/ghost:/var/lib/ghost/content
    networks:
      - ghost-network

  ghost_database:
    image: mysql:8
    container_name: ghost_database
    restart: always
    environment:
      MYSQL_ROOT_PASSWORD: YourRandomMySQLRootPassword
      MYSQL_DATABASE: ghost_database
      MYSQL_USER: ghost_user
      MYSQL_PASSWORD: YourRandomMySQLPassword
    volumes:
      - ./data/mysql:/var/lib/mysql
    networks:
      - ghost-network

  caddy:
    image: caddy:alpine
    container_name: caddy
    restart: always
    ports:
      - &quot;80:80/tcp&quot;
      - &quot;443:443/tcp&quot;
      - &quot;443:443/udp&quot;
    volumes:
      - ./caddy/etc/caddy:/etc/caddy
      - ./caddy/data:/data
      - ./caddy/config:/config
      - ./caddy/srv:/srv
    networks:
      - ghost-network

  watchtower:
    image: nickfedor/watchtower:latest
    container_name: watchtower
    restart: always
    volumes:
      - /var/run/docker.sock:/var/run/docker.sock
    environment:
      - WATCHTOWER_CLEANUP=true
      - WATCHTOWER_POLL_INTERVAL=86400
    networks:
      - ghost-network

networks:
  ghost-network:
    name: ghost-network
&#39; | sudo tee ./compose.yaml
</code></pre>
<p>Create a <code>Caddyfile</code>:</p>
<pre><code class="language-bash">sudo mkdir -p ./caddy/etc/caddy

sudo bash -c &#39;cat &gt; ./caddy/etc/caddy/Caddyfile &lt;&lt; &quot;EOF&quot;
example.com {
    header {
        -Server
        Strict-Transport-Security &quot;max-age=31536000; includeSubDomains; preload&quot;
        X-Content-Type-Options &quot;nosniff&quot;
        X-Frame-Options &quot;SAMEORIGIN&quot;
        Referrer-Policy &quot;strict-origin-when-cross-origin&quot;
    }

    reverse_proxy http://ghost:2368 {
        header_up Host {host}
    }

    encode zstd gzip
}
EOF&#39;
</code></pre>
<p>Pull all the images and start the containers:</p>
<pre><code class="language-bash">docker compose pull
docker compose up -d
</code></pre>
<p>Wait a few minutes, then visit <code>https://example.com/</code> in your browser.</p>
<blockquote>
<p>Replace <code>example.com</code> with your own domain name in the <code>Caddyfile</code>. Also make sure your DNS A/AAAA records point to this server.</p>
</blockquote>
]]></content>
        <author>
            <name>Xiufeng Guo</name>
            <email>i@m.ac</email>
            <uri>https://m.ac</uri>
        </author>
        <published>2025-05-05T19:39:13.000Z</published>
    </entry>
    <entry>
        <title type="html"><![CDATA[Get Let's Encrypt certificates for IP addresses with acme.sh]]></title>
        <id>https://m.ac/letsencrypt-ip-certificate/</id>
        <link href="https://m.ac/letsencrypt-ip-certificate/"/>
        <updated>2026-01-15T18:55:48.000Z</updated>
        <summary type="html"><![CDATA[Issue free TLS certificates for IP addresses with acme.sh and Let's Encrypt, then serve them with NGINX over HTTP/2 and HTTP/3.]]></summary>
        <content type="html"><![CDATA[<p>This guide uses <code>acme.sh</code> to obtain Let&#39;s Encrypt TLS certificates for IP addresses.</p>
<p>For a long time, Let&#39;s Encrypt issued certificates only for <strong>domain names</strong>. After several months of <a href="https://letsencrypt.org/2025/07/01/issuing-our-first-ip-address-certificate">testing</a>, Let&#39;s Encrypt made six-day and IP address certificates generally available on January 15, 2026.</p>
<h2>1. Why issue certificates for IP addresses</h2>
<p>Sometimes a domain name is unnecessary, but <strong>HTTPS is still required</strong>:</p>
<ol>
<li><p><strong>DNS over HTTPS (DoH) services that operate independently of domain resolution</strong></p>
<p>Running DoH directly on an IP address avoids the old philosophical headache: doing an insecure DNS lookup before opening a secure DNS connection.</p>
</li>
<li><p><strong>Default server blocks that should not expose real names</strong></p>
<p>A default HTTPS vhost can present an IP certificate instead of leaking one of your real hostnames.</p>
</li>
<li><p><strong>Temporary services or test environments</strong></p>
<p>You can bring up HTTPS without creating DNS records first.</p>
</li>
<li><p><strong>Avoiding domain exposure in Certificate Transparency logs</strong></p>
<p>If a service does not need a domain name, an IP certificate avoids publishing that domain name in public CT logs.</p>
</li>
</ol>
<h2>2. Prerequisites</h2>
<p>The commands below use <code>sudo</code>. If you prefer a root shell, run <code>sudo -i</code> first and drop <code>sudo</code> from the commands.</p>
<p>Update <code>acme.sh</code> first:</p>
<pre><code class="language-bash">acme.sh --upgrade
</code></pre>
<p>IP address certificates can only use <a href="https://letsencrypt.org/docs/challenge-types/#http-01-challenge">http-01</a> or <a href="https://letsencrypt.org/docs/challenge-types/#tls-alpn-01">tls-alpn-01</a> validation. Make sure your firewall allows public access to TCP port 80 and TCP/UDP port 443.</p>
<h2>3. Configure the NGINX default server for port 80</h2>
<p>Set up a default NGINX server block on port 80.</p>
<p>On Debian or Ubuntu systems with NGINX installed, replace <code>/etc/nginx/sites-available/default</code> with this configuration:</p>
<pre><code class="language-nginx">server {
    # Listen on port 80 for all IPv4 and IPv6 addresses
    listen 80 default_server;
    listen [::]:80 default_server;

    # Match all domain names
    server_name _;

    # Merge Let&#39;s Encrypt and SSL verification path configuration
    location ~ ^/.well-known/(acme-challenge|pki-validation)/ {
        add_header Content-Type text/plain;
        root /var/www/letsencrypt;
    }

    # Redirect all other HTTP requests to HTTPS using 301 permanent redirect
    location / {
        return 301 https://$host$request_uri;
    }
}
</code></pre>
<p>Create the required directories and reload NGINX:</p>
<pre><code class="language-bash">sudo mkdir -p /var/www/letsencrypt
sudo mkdir -p /etc/nginx/ssl
sudo nginx -t
sudo nginx -s reload
</code></pre>
<h2>4. Issue the IP address certificate with acme.sh</h2>
<p>Assume your server&#39;s IP addresses are <code>192.0.2.2</code> and <code>2001:db8::2</code>, and request the <code>shortlived</code> profile:</p>
<pre><code class="language-bash">acme.sh --issue --server letsencrypt -d 192.0.2.2 -d 2001:db8::2 \
  -w /var/www/letsencrypt \
  --certificate-profile shortlived \
  --days 3
</code></pre>
<p>The <a href="https://letsencrypt.org/docs/profiles/#shortlived">shortlived</a> profile is required for IP address certificates. Let&#39;s Encrypt limits these certificates to 160 hours, so <code>acme.sh</code> needs to check renewal more often than it would for a normal 90-day certificate. <code>--days 3</code> checks every 3 days. A value of 4 or 5 can still work, but 6 or higher is asking for an avoidable expiry page.</p>
<p>If issuance succeeds, you will see output like this:</p>
<pre><code>[Wed Dec 17 05:46:28 AM UTC 2025] Using CA: https://acme-v02.api.letsencrypt.org/directory
[Wed Dec 17 05:46:28 AM UTC 2025] Multi domain=&#39;IP:192.0.2.2,IP:2001:db8::2&#39;
[Wed Dec 17 05:46:30 AM UTC 2025] Getting webroot for domain=&#39;192.0.2.2&#39;
[Wed Dec 17 05:46:30 AM UTC 2025] Getting webroot for domain=&#39;2001:db8::2&#39;
[Wed Dec 17 05:46:30 AM UTC 2025] Verifying: 192.0.2.2
[Wed Dec 17 05:46:31 AM UTC 2025] Pending. The CA is processing your order, please wait. (1/30)
[Wed Dec 17 05:46:34 AM UTC 2025] Success
[Wed Dec 17 05:46:34 AM UTC 2025] Verifying: 2001:db8::2
[Wed Dec 17 05:46:35 AM UTC 2025] Pending. The CA is processing your order, please wait. (1/30)
[Wed Dec 17 05:46:38 AM UTC 2025] Success
[Wed Dec 17 05:46:38 AM UTC 2025] Verification finished, beginning signing.
[Wed Dec 17 05:46:38 AM UTC 2025] Let&#39;s finalize the order.
[Wed Dec 17 05:46:38 AM UTC 2025] Le_OrderFinalize=&#39;https://acme-v02.api.letsencrypt.org/acme/finalize/blablablablablablablabla/blablablablablablablabla&#39;
[Wed Dec 17 05:46:41 AM UTC 2025] Downloading cert.
[Wed Dec 17 05:46:41 AM UTC 2025] Le_LinkCert=&#39;https://acme-v02.api.letsencrypt.org/acme/cert/blablablablablablablabla&#39;
[Wed Dec 17 05:46:42 AM UTC 2025] Cert success.
-----BEGIN CERTIFICATE-----
blablablablablablablablablablablablablablablablablablabla
-----END CERTIFICATE-----
[Wed Dec 17 05:46:42 AM UTC 2025] Your cert is in: /root/.acme.sh/192.0.2.2_ecc/192.0.2.2.cer
[Wed Dec 17 05:46:42 AM UTC 2025] Your cert key is in: /root/.acme.sh/192.0.2.2_ecc/192.0.2.2.key
[Wed Dec 17 05:46:42 AM UTC 2025] The intermediate CA cert is in: /root/.acme.sh/192.0.2.2_ecc/ca.cer
[Wed Dec 17 05:46:42 AM UTC 2025] And the full-chain cert is in: /root/.acme.sh/192.0.2.2_ecc/fullchain.cer
</code></pre>
<p>Install the issued certificate into <code>/etc/nginx/ssl</code>:</p>
<pre><code class="language-bash">acme.sh --install-cert -d 192.0.2.2 \
  --key-file       /etc/nginx/ssl/ip.key  \
  --fullchain-file /etc/nginx/ssl/ip.crt \
  --ca-file        /etc/nginx/ssl/ip.ca.crt \
  --reloadcmd     &quot;systemctl restart nginx&quot;
</code></pre>
<h2>5. Configure the NGINX default server for port 443</h2>
<p>After installing the certificate, add the default HTTPS server block to <code>/etc/nginx/sites-available/default</code>:</p>
<pre><code class="language-nginx"># HTTPS server block for all HTTPS requests
server {
    # Standard TLS listening
    listen 443 ssl default_server;
    listen [::]:443 ssl default_server;

    # HTTP/2 protocol support
    http2 on;

    # HTTP/3 QUIC protocol support
    listen 443 quic reuseport;
    listen [::]:443 quic reuseport;
    add_header Alt-Svc &#39;h3=&quot;:443&quot;; ma=86400&#39; always;
    add_header X-Protocol $server_protocol always;

    # Match all domain names
    server_name _;
    return 403;

    # modern configuration
    ssl_protocols TLSv1.3;
    ssl_ecdh_curve X25519:prime256v1:secp384r1;
    ssl_prefer_server_ciphers off;

    ssl_certificate /etc/nginx/ssl/ip.crt;
    ssl_certificate_key /etc/nginx/ssl/ip.key;
}
</code></pre>
<p>Test the configuration and reload NGINX:</p>
<pre><code class="language-bash">sudo nginx -t
sudo nginx -s reload
</code></pre>
<p>After this is configured, <code>https://192.0.2.2/</code> returns a 403 page. Check the certificate details and the <code>Subject Alt Names</code> field should show <code>IP Address</code>:</p>
<p><a href="https://macdn.net/2025/12/17/image_sK4sr.png"><img src="https://macdn.net/2025/12/17/image_sK4sr.png" alt="IP Certificate Works"></a></p>
]]></content>
        <author>
            <name>Xiufeng Guo</name>
            <email>i@m.ac</email>
            <uri>https://m.ac</uri>
        </author>
        <published>2026-01-15T18:55:48.000Z</published>
    </entry>
    <entry>
        <title type="html"><![CDATA[Issue Let's Encrypt certificates automatically with nginx-acme on Debian and Ubuntu]]></title>
        <id>https://m.ac/nginx-acme-auto-ssl-debian-ubuntu/</id>
        <link href="https://m.ac/nginx-acme-auto-ssl-debian-ubuntu/"/>
        <updated>2026-01-15T18:23:05.000Z</updated>
        <summary type="html"><![CDATA[Set up nginx-acme on Debian or Ubuntu, configure NGINX virtual hosts, and let NGINX request and renew Let's Encrypt certificates.]]></summary>
        <content type="html"><![CDATA[<p>This guide sets up TLS certificates on <strong>Debian Stable</strong> and <strong>Ubuntu LTS</strong> with <strong>nginx-acme</strong>, NGINX&#39;s official ACME module.</p>
<h2>1. What is nginx-acme?</h2>
<p><a href="https://github.com/nginx/nginx-acme">nginx-acme</a> is an official NGINX module that implements ACME. It lets NGINX request and renew TLS certificates without a separate ACME client.</p>
<p>If you have used <a href="https://caddyserver.com/">Caddy</a>, the idea will feel familiar: certificate automation lives in the web server config.</p>
<p>The module is implemented in Rust (unlike NGINX itself, which is written in C) and supports the following standards:</p>
<ul>
<li><a href="https://datatracker.ietf.org/doc/html/rfc8555">RFC 8555 (ACME)</a></li>
<li><a href="https://datatracker.ietf.org/doc/html/rfc8737">RFC 8737 (TLS-ALPN-01)</a></li>
<li><a href="https://datatracker.ietf.org/doc/html/rfc8738">RFC 8738 (IP identifiers)</a></li>
<li><a href="https://datatracker.ietf.org/doc/draft-ietf-acme-profiles/">draft-ietf-acme-profiles</a></li>
</ul>
<p>In my testing, it has behaved well enough for production use. Still watch your logs, because certificate automation is one of those things you only notice when it stops working.</p>
<h2>2. Install N.WTF (NGINX with nginx-acme)</h2>
<p>This guide uses <a href="https://n.wtf/">N.WTF</a>, packaged by <a href="https://m.ac/">m.ac</a>. Its <code>nginx-extras</code> package includes <code>nginx-acme</code>.</p>
<p>The commands below use <code>sudo</code>. If you prefer a root shell, run <code>sudo -i</code> first and drop <code>sudo</code> from the commands.</p>
<p>Install the required packages:</p>
<pre><code class="language-bash">sudo apt update
sudo apt upgrade -y
sudo apt install curl vim wget gnupg dpkg apt-transport-https lsb-release ca-certificates
</code></pre>
<p>Import the N.WTF signing key and add the APT repository:</p>
<pre><code class="language-bash">curl -sSL https://n.wtf/public.key | sudo gpg --dearmor -o /usr/share/keyrings/n.wtf.gpg
echo &quot;deb [arch=$(dpkg --print-architecture) signed-by=/usr/share/keyrings/n.wtf.gpg] https://mirror-cdn.xtom.com/sb/nginx/ $(lsb_release -sc) main&quot; | sudo tee /etc/apt/sources.list.d/n.wtf.list
</code></pre>
<p>On Debian, <a href="https://m.ac/use-extrepo-add-third-party-repositories-debian/">extrepo</a> can add the same repository:</p>
<pre><code class="language-bash">sudo apt update
sudo apt install extrepo -y
sudo extrepo enable n.wtf
</code></pre>
<p>Install NGINX:</p>
<pre><code class="language-bash">sudo apt update
sudo apt install nginx-extras -y
</code></pre>
<h2>3. Prepare the certificate directory</h2>
<p>Create a directory for ACME state and certificates. This example uses <code>/var/cache/nginx/letsencrypt</code>:</p>
<pre><code class="language-bash">sudo mkdir -p /var/cache/nginx/letsencrypt
sudo chown 33:33 /var/cache/nginx -R
</code></pre>
<p>Make sure your domain&#39;s A and AAAA records point to this server before you continue.</p>
<h2>4. Configure an NGINX site with a www redirect</h2>
<p>This example assumes:</p>
<ul>
<li>Your domains are <code>example.com</code> and <code>www.example.com</code></li>
<li>You want <code>www.example.com</code> to redirect to <code>example.com</code></li>
<li>Your contact email is <code>user@example.com</code></li>
</ul>
<p>Edit <code>/etc/nginx/sites-enabled/default</code> and use this configuration:</p>
<pre><code class="language-nginx">resolver 8.8.8.8:53 ipv6=off valid=5s; # Or replace to your preferred DNS resolver

acme_issuer letsencrypt {
    uri         https://acme-v02.api.letsencrypt.org/directory;
    contact     user@example.com;
    state_path  /var/cache/nginx/letsencrypt;
    accept_terms_of_service;
    ssl_trusted_certificate /etc/ssl/certs/ca-certificates.crt;
    ssl_verify on;
}

acme_shared_zone zone=ngx_acme_shared:1M;

server {
    # Listen on port 80 for ACME HTTP-01 validation and HTTP-&gt;HTTPS redirects
    listen 80 default_server;
    listen [::]:80 default_server;

    server_name _;

    # Let nginx-acme handle ACME HTTP-01 challenges.
    # Do not block /.well-known/acme-challenge/ here.
    location /.well-known/acme-challenge/ {
        # nginx-acme serves this internally.
        # Keeping the block empty avoids accidental 404s.
    }

    # Redirect all other HTTP requests to HTTPS
    location / {
        return 301 https://$host$request_uri;
    }
}

server {
    # Standard TLS listening
    listen 443 ssl default_server;
    listen [::]:443 ssl default_server;

    # HTTP/2
    http2 on;

    # HTTP/3 (QUIC)
    listen 443 quic reuseport;
    listen [::]:443 quic reuseport;
    add_header Alt-Svc &#39;h3=&quot;:443&quot;; ma=86400&#39; always;
    add_header X-Protocol $server_protocol always;

    server_name example.com;

    root /var/www/html;
    index index.html;

    # Modern TLS settings
    ssl_protocols TLSv1.3;
    ssl_ecdh_curve X25519:prime256v1:secp384r1;
    ssl_prefer_server_ciphers off;

    # Enable certificate automation for this server block
    acme_certificate letsencrypt;

    ssl_certificate       $acme_certificate;
    ssl_certificate_key   $acme_certificate_key;

    # Avoid parsing the certificate on every request
    ssl_certificate_cache max=2;
}

server {
    listen 443 ssl;
    listen [::]:443 ssl;

    http2 on;

    listen 443 quic;
    listen [::]:443 quic;

    add_header Alt-Svc &#39;h3=&quot;:443&quot;; ma=86400&#39; always;
    add_header X-Protocol $server_protocol always;

    server_name www.example.com;
    return 301 https://example.com$request_uri;

    ssl_protocols TLSv1.3;
    ssl_ecdh_curve X25519:prime256v1:secp384r1;
    ssl_prefer_server_ciphers off;

    acme_certificate letsencrypt;

    ssl_certificate       $acme_certificate;
    ssl_certificate_key   $acme_certificate_key;

    ssl_certificate_cache max=2;
}
</code></pre>
<p>Test the configuration and reload NGINX:</p>
<pre><code class="language-bash">sudo nginx -t
sudo nginx -s reload
</code></pre>
<h2>5. Verify certificate issuance</h2>
<p>After NGINX reloads, nginx-acme requests a certificate. Watch the access log while it validates:</p>
<pre><code class="language-bash">sudo tail -f /var/log/nginx/access.log
</code></pre>
<p>You should see requests to <code>/.well-known/acme-challenge/</code> from Let&#39;s Encrypt validation servers. A few seconds later, <code>https://example.com/</code> should answer with a valid certificate.</p>
<p>Example log entries:</p>
<pre><code class="language-log">23.178.112.210 - - [15/Jan/2026:16:08:18 +0000] &quot;GET /.well-known/acme-challenge/blablablablablablablablablablablablablablab HTTP/1.1&quot; 200 87 &quot;-&quot; &quot;Mozilla/5.0 (compatible; Let&#39;s Encrypt validation server; +https://www.letsencrypt.org)&quot;
34.212.137.78 - - [15/Jan/2026:16:08:18 +0000] &quot;GET /.well-known/acme-challenge/blablablablablablablablablablablablablablab HTTP/1.1&quot; 200 87 &quot;-&quot; &quot;Mozilla/5.0 (compatible; Let&#39;s Encrypt validation server; +https://www.letsencrypt.org)&quot;
</code></pre>
<h2>6. IP address certificates with the shortlived profile</h2>
<p>To request a certificate for an IP address, add this line inside the <code>acme_issuer letsencrypt {}</code> block:</p>
<pre><code class="language-nginx">profile     shortlived;
</code></pre>
<p>Also set <code>server_name</code> to the full IP address. You cannot use <code>server_name _</code> for an IP certificate.</p>
]]></content>
        <author>
            <name>Xiufeng Guo</name>
            <email>i@m.ac</email>
            <uri>https://m.ac</uri>
        </author>
        <published>2026-01-15T18:22:52.000Z</published>
    </entry>
    <entry>
        <title type="html"><![CDATA[RDAP.SS: WHOIS lookup powered by RDAP]]></title>
        <id>https://m.ac/rdap-ss-whois-lookup/</id>
        <link href="https://m.ac/rdap-ss-whois-lookup/"/>
        <updated>2025-11-03T08:29:15.000Z</updated>
        <summary type="html"><![CDATA[RDAP.SS is a WHOIS lookup site built on RDAP. This post explains what RDAP fixes and how to use RDAP.SS.]]></summary>
        <content type="html"><![CDATA[<h2>1. What is the RDAP protocol?</h2>
<p><a href="https://www.icann.org/en/contracted-parties/registry-operators/resources/registration-data-access-protocol"><strong>RDAP</strong></a> stands for <strong>Registration Data Access Protocol</strong>.</p>
<p>The IETF developed RDAP as a structured replacement for the traditional WHOIS system.</p>
<p>RDAP provides standardized access to registration data for:</p>
<ul>
<li>Domains</li>
<li>IP addresses (IPv4 / IPv6)</li>
<li>ASNs (Autonomous System Numbers)</li>
</ul>
<p>RDAP&#39;s original RFC set includes <a href="https://www.rfc-editor.org/rfc/rfc7480.txt">RFC 7480</a> through <a href="https://www.rfc-editor.org/rfc/rfc7484.txt">RFC 7484</a>. Later documents obsolete and replace parts of the original set: <a href="https://www.rfc-editor.org/rfc/rfc9082">RFC 9082</a>, <a href="https://www.rfc-editor.org/rfc/rfc9083">RFC 9083</a>, and <a href="https://www.rfc-editor.org/rfc/rfc9224">RFC 9224</a> supersede RFCs 7482, 7483, and 7484 respectively.</p>
<hr>
<h2>2. RDAP vs. WHOIS: what is different?</h2>
<p>The short version:</p>
<table>
<thead>
<tr>
<th>Feature</th>
<th>WHOIS</th>
<th>RDAP</th>
</tr>
</thead>
<tbody><tr>
<td>Transport</td>
<td>Plain TCP text</td>
<td>HTTP API, usually HTTPS</td>
</tr>
<tr>
<td>Data format</td>
<td>Unstructured text</td>
<td>Structured JSON</td>
</tr>
<tr>
<td>Internationalization</td>
<td>Poor (encoding varies)</td>
<td>Full UTF-8 support</td>
</tr>
<tr>
<td>Security</td>
<td>No encryption or auth</td>
<td>HTTPS and optional auth</td>
</tr>
<tr>
<td>Distributed lookup</td>
<td>Manual redirection</td>
<td>Built-in <code>bootstrap</code> mechanism</td>
</tr>
<tr>
<td>Standardization</td>
<td>Inconsistent formats</td>
<td>Uniform, machine-readable schema</td>
</tr>
</tbody></table>
<p>In the old WHOIS world, clients connected to port 43, sent a plain-text query, and received whatever the server felt like sending back. For gTLDs, that world is already over: ICANN <a href="https://www.icann.org/en/announcements/details/icann-update-launching-rdap-sunsetting-whois-27-01-2025-en">sunset port-43 WHOIS on January 28, 2025</a>, making RDAP the definitive source for gTLD registration data. Many ccTLDs still run WHOIS, though.</p>
<p>Every registry had its own format. Sometimes the field for the registrant&#39;s email was <code>Registrant Email</code>, sometimes <code>Contact Email</code>, and sometimes something much stranger.</p>
<p>Developers had to write endless regex parsers just to extract data that should have been structured in the first place.</p>
<p>(If you have ever tried to parse WHOIS data, you probably still wake up sweating from that nightmare.)</p>
<p>The old WHOIS protocol has a few practical problems:</p>
<h3>2.1 No structure, no standard API</h3>
<p>Every registry returns data differently, so automation is painful.</p>
<h3>2.2 No encryption</h3>
<p>Port 43 uses plain text, so your ISP can see which domains you are querying. Not great.</p>
<h3>2.3 No access control</h3>
<p>WHOIS servers usually see only your IP address. They cannot reliably tell users apart, apply permissions, or enforce identity-based limits.</p>
<h3>2.4 Messy management</h3>
<p>Each TLD needs a custom WHOIS server definition because WHOIS has no global bootstrap list like RDAP.</p>
<hr>
<h2>3. Why RDAP is better for tools</h2>
<p>RDAP fixes the worst parts of WHOIS and gives developers something they can parse without inventing a new regex crime scene.</p>
<h3>3.1 Standardized JSON output</h3>
<p>RDAP responses are structured JSON objects with clearly defined fields.  </p>
<p>For example:</p>
<pre><code class="language-json">{
  &quot;objectClassName&quot;: &quot;domain&quot;,
  &quot;ldhName&quot;: &quot;example.com&quot;,
  &quot;status&quot;: [&quot;active&quot;],
  &quot;entities&quot;: [...]
}
</code></pre>
<p>No regex horror show. Your code gets JSON.</p>
<h3>3.2 A unified API</h3>
<p>RDAP runs over <strong>HTTP/HTTPS</strong> using a RESTful API.  </p>
<p>You can make normal GET requests and script lookups in almost any language.</p>
<p>Example:</p>
<pre><code class="language-bash">curl https://rdap.verisign.com/com/v1/domain/example.com
</code></pre>
<p>This returns structured data directly from the registry, without scraping.</p>
<h3>3.3 Automatic bootstrap</h3>
<p>RDAP clients do not need to know which registry to ask.</p>
<p>They follow IANA&#39;s <a href="https://data.iana.org/rdap/">bootstrap data</a> to find the correct RDAP server for each TLD or RIR.</p>
<p><a href="https://deployment.rdap.org/">RDAP.org</a> tracks deployment daily. Common gTLDs such as <code>.com</code>, <code>.net</code>, and <code>.org</code> already have RDAP base URLs in the bootstrap data, while many ccTLDs still do not.</p>
<p>For those TLDs, manual configuration or a fallback still matters.</p>
<h3>3.4 Security and privacy</h3>
<p>For gTLDs, RDAP runs over <strong>HTTPS</strong>, which avoids the plaintext leakage that comes with port 43 WHOIS.</p>
<p>Registries can also use <strong>OAuth 2.0 or token-based authentication</strong> and return different data based on the requester&#39;s role, such as public user, registrar, or law enforcement.</p>
<p>That makes it easier to expose public data while keeping restricted registration data behind the right access checks.</p>
<h3>3.5 Extensibility</h3>
<p>RDAP supports <strong>extensions</strong>, allowing registries to add custom fields without breaking compatibility.</p>
<p>Example:</p>
<pre><code class="language-json">&quot;rdapConformance&quot;: [&quot;rdap_level_0&quot;, &quot;icann_rdap_technical_implementation_guide_0&quot;]
</code></pre>
<p>Extensions let registries add fields without replacing the protocol.</p>
<hr>
<h2>4. Introducing RDAP.SS</h2>
<p>I built a small WHOIS lookup site on top of RDAP: <a href="https://rdap.ss/"><strong>RDAP.SS</strong></a></p>
<p>It uses <strong>Next.js</strong>, <strong>Tailwind CSS</strong>, and <strong>Redis caching</strong>, the usual suspects for a fast web app.</p>
<p>It supports queries in these formats:</p>
<ul>
<li>Domain → <a href="https://rdap.ss/whois/google.com"><code>https://rdap.ss/whois/google.com</code></a></li>
<li>IPv4 → <a href="https://rdap.ss/whois/8.8.8.8"><code>https://rdap.ss/whois/8.8.8.8</code></a></li>
<li>IPv4 CIDR → <a href="https://rdap.ss/whois/8.8.8.0/24"><code>https://rdap.ss/whois/8.8.8.0/24</code></a></li>
<li>IPv6 → <a href="https://rdap.ss/whois/2001:4860:4860::8888"><code>https://rdap.ss/whois/2001:4860:4860::8888</code></a></li>
<li>IPv6 CIDR → <a href="https://rdap.ss/whois/2001:4860::/32"><code>https://rdap.ss/whois/2001:4860::/32</code></a></li>
<li>ASN → <a href="https://rdap.ss/whois/AS15169"><code>https://rdap.ss/whois/AS15169</code></a></li>
</ul>
<p>Note: only TLDs with RDAP endpoints can be queried. If a registry does not have an RDAP endpoint yet, the lookup returns an error. Sorry, <code>dot legacy</code> fans.</p>
<p>If you run into a bug or have a feature idea, open an <a href="https://github.com/rdapss/rdap.ss/issues">issue on GitHub</a>.</p>
]]></content>
        <author>
            <name>Xiufeng Guo</name>
            <email>i@m.ac</email>
            <uri>https://m.ac</uri>
        </author>
        <published>2025-11-03T08:20:32.000Z</published>
    </entry>
    <entry>
        <title type="html"><![CDATA[How to use extrepo to add third-party repositories in Debian]]></title>
        <id>https://m.ac/use-extrepo-add-third-party-repositories-debian/</id>
        <link href="https://m.ac/use-extrepo-add-third-party-repositories-debian/"/>
        <updated>2025-10-20T22:58:16.000Z</updated>
        <summary type="html"><![CDATA[Use extrepo to add third-party Debian repositories without hand-copying keys and APT source files.]]></summary>
        <content type="html"><![CDATA[<h2>Introduction</h2>
<h3>What is extrepo?</h3>
<p>The <a href="https://packages.debian.org/stable/extrepo">extrepo tool</a> manages external repositories in Debian. Before extrepo, installing software that was not packaged for Debian usually meant writing APT configuration files by hand, running an unsigned script as root, or installing an unsigned <code>.deb</code> package that dropped repository configuration onto the system.</p>
<p>None of those options felt great.</p>
<p>Take the <a href="https://docs.docker.com/engine/install/debian/">Docker repository</a> as an example. Older instructions usually use one of these three methods.</p>
<p>The first is the traditional <strong>one-line style</strong>:</p>
<pre><code class="language-bash">curl -sSL https://download.docker.com/linux/debian/gpg | sudo gpg --dearmor -o /usr/share/keyrings/docker-ce.gpg

echo &quot;deb [arch=$(dpkg --print-architecture) signed-by=/usr/share/keyrings/docker-ce.gpg] https://download.docker.com/linux/debian $(lsb_release -sc) stable&quot; | sudo tee /etc/apt/sources.list.d/docker-ce.list

sudo apt update
sudo apt install docker-ce docker-ce-cli containerd.io docker-compose-plugin -y
</code></pre>
<p>The second uses the newer <strong>DEB822</strong> format:</p>
<pre><code class="language-bash">curl -sSL https://download.docker.com/linux/debian/gpg | sudo gpg --dearmor -o /usr/share/keyrings/docker-ce.gpg

sudo bash -c &#39;cat &gt; /etc/apt/sources.list.d/docker-ce.sources &lt;&lt; EOF
Components: stable
Architectures: $(dpkg --print-architecture)
Suites: $(lsb_release -cs)
Types: deb
Uris: https://download.docker.com/linux/debian
Signed-By: /usr/share/keyrings/docker-ce.gpg
EOF&#39;

sudo apt update
sudo apt install docker-ce docker-ce-cli containerd.io docker-compose-plugin -y
</code></pre>
<p>Or you can use a Linux installation script:</p>
<pre><code class="language-bash">curl -fsSL https://get.docker.com -o get-docker.sh
sudo sh get-docker.sh
</code></pre>
<p>With the first two methods, you download the GPG key, import it into the system, create the APT source files, and update the package lists yourself. The installation script does all of that for you, but the price is piping an unaudited remote script straight into a root shell and trusting whatever it decides to run.</p>
<p>With <em>extrepo</em>, that work becomes a couple of commands, and the repository metadata is GPG-verified against a keyring that ships in Debian itself.</p>
<h2>Installing and using extrepo</h2>
<p>The following steps require root privileges. The commands use <code>sudo</code>, so make sure your user can run it. You can also switch to root with <code>sudo -i</code> and remove the <code>sudo</code> prefix from the commands.</p>
<p>Install <em>extrepo</em> on Debian Stable:</p>
<pre><code class="language-bash">sudo apt update
sudo apt install extrepo -y
</code></pre>
<p>After that, enable a third-party repository such as Docker CE:</p>
<pre><code class="language-bash">sudo extrepo enable docker-ce
</code></pre>
<p>Once the repository is enabled, update your package lists and install Docker.</p>
<pre><code class="language-bash">sudo apt update
sudo apt install docker-ce docker-ce-cli containerd.io docker-compose-plugin -y
</code></pre>
<p>You will now have a new file named <code>extrepo_docker-ce.sources</code> in <code>/etc/apt/sources.list.d</code>:</p>
<pre><code class="language-bash">$ cat /etc/apt/sources.list.d/extrepo_docker-ce.sources 
Suites: trixie
Types: deb
Uris: https://download.docker.com/linux/debian
Components: stable
Architectures: amd64 arm64 armhf s390x ppc64el
Signed-By: /var/lib/extrepo/keys/docker-ce.asc
</code></pre>
<p>In other words, <em>extrepo</em> takes care of the two annoying parts:</p>
<ol>
<li>It fetches a verified GPG key.</li>
<li>It writes the APT configuration in DEB822 format.</li>
</ol>
<p>You no longer have to search the web for repository snippets or installation scripts. The command is shorter, and more importantly, the repository metadata has a maintainer.</p>
<h2>External repository metadata</h2>
<p>The <em>extrepo</em> database is maintained by the <a href="https://salsa.debian.org/extrepo-team"><strong>Debian External Repositories Team</strong></a>, and the database itself is called <a href="https://salsa.debian.org/extrepo-team/extrepo-data"><strong>extrepo-data</strong></a>.</p>
<p>I personally maintain several third-party software sources that we use on our servers, such as <a href="https://salsa.debian.org/extrepo-team/extrepo-data/-/commits/master/repos/debian/redis.yaml?ref_type=heads">Redis</a>, <a href="https://salsa.debian.org/extrepo-team/extrepo-data/-/commits/master/repos/debian/mariadb.yaml?ref_type=heads">MariaDB</a>, and <a href="https://salsa.debian.org/extrepo-team/extrepo-data/-/commits/master/repos/debian/n.wtf.yaml?ref_type=heads">N.WTF</a>. You can view my commits <a href="https://salsa.debian.org/showfom/extrepo-data/-/commits/master?author=Xiufeng%20Guo">here</a>.</p>
<p>Anyone can contribute to this Git repository, and the YAML syntax is easy to learn. You can view the template <a href="https://salsa.debian.org/extrepo-team/extrepo-data/-/blob/master/template.yaml?ref_type=heads">here</a>.</p>
<p>For a complete list of third-party repositories, browse the <code>.yaml</code> files <a href="https://salsa.debian.org/extrepo-team/extrepo-data/-/tree/master/repos/debian?ref_type=heads">here</a>.</p>
<h2>Where extrepo helps</h2>
<p><em>extrepo</em> is a cleaner way to add third-party repositories on Debian.</p>
<p>Its main advantage is boring, which is exactly what you want from repository configuration: it enables tested and verified software sources without making you copy keys and source files by hand. When a third-party repository&#39;s GPG key expires or its URI changes, which happens often enough to be annoying, you do not have to update it manually.</p>
<p>For Docker, run <code>sudo extrepo enable docker-ce</code> once. Later, <code>sudo extrepo update docker-ce</code> refreshes the repository&#39;s GPG key and URI.</p>
<p>The catch: <em>extrepo</em> currently supports Debian, while Ubuntu compatibility is limited. Also, because <a href="https://extrepo-team.pages.debian.net/extrepo-data/"><strong>extrepo-data</strong></a> is hosted on Debian&#39;s official GitLab Pages, self-hosting it is still not especially convenient.</p>
]]></content>
        <author>
            <name>Xiufeng Guo</name>
            <email>i@m.ac</email>
            <uri>https://m.ac</uri>
        </author>
        <published>2025-10-20T20:08:34.000Z</published>
    </entry>
    <entry>
        <title type="html"><![CDATA[Install Mastodon on Debian and Ubuntu]]></title>
        <id>https://m.ac/install-mastodon-debian-ubuntu/</id>
        <link href="https://m.ac/install-mastodon-debian-ubuntu/"/>
        <updated>2025-10-14T18:22:43.000Z</updated>
        <summary type="html"><![CDATA[Install Mastodon on Debian Stable or Ubuntu LTS with PostgreSQL, Redis, Nginx, SSL certificates, systemd services, and optional Elasticsearch search.]]></summary>
        <content type="html"><![CDATA[<p>I <a href="https://github.com/mastodon/documentation/commit/98d85c9f48477958f946eea8c1e7e770bfd4596f">contributed to</a> the official Mastodon installation guide back in 2022. It has drifted since then, as server guides tend to do. This version walks through installing and configuring a Mastodon instance on your own server.</p>
<hr>
<h2>1. What is Mastodon?</h2>
<p><a href="https://joinmastodon.org/">Mastodon</a> is a free, open-source, decentralized social network. It feels familiar if you have used Twitter or X, but one company does not own the whole thing.</p>
<p>Instead of everyone joining one central site, users create or join independently operated servers called instances that communicate across the wider Fediverse.</p>
<p>Running your own Mastodon instance gives you full control over your community, data, and content policies.</p>
<hr>
<h2>2. Prerequisites</h2>
<p>Have these ready before you start:</p>
<ul>
<li><p>A domain name with DNS A/AAAA records pointed to your server&#39;s IP address. This tutorial uses <code>example.com</code> as the placeholder.</p>
</li>
<li><p>A Linux server with <a href="https://www.debian.org/releases/">Debian Stable</a> or <a href="https://releases.ubuntu.com/">Ubuntu LTS</a> installed and a user with <code>sudo</code> privileges.</p>
</li>
<li><p>An email delivery service such as Mailgun or Amazon Simple Email Service.</p>
</li>
</ul>
<p>The commands below use <code>sudo</code>. If you prefer a root shell, run <code>sudo -i</code> first and drop <code>sudo</code> from the commands.</p>
<p>Log in to your server and update the system:</p>
<pre><code class="language-bash">sudo apt update
sudo apt upgrade -y
sudo apt full-upgrade -y
</code></pre>
<p>Install the required software and dependencies:</p>
<pre><code class="language-bash">sudo apt install curl vim wget gnupg dpkg apt-transport-https lsb-release ca-certificates -y
</code></pre>
<hr>
<h2>3. Add package repositories</h2>
<p>Nginx</p>
<pre><code class="language-bash">curl -sS https://n.wtf/public.key | sudo gpg --dearmor -o /usr/share/keyrings/n.wtf.gpg

echo &quot;deb [arch=$(dpkg --print-architecture) signed-by=/usr/share/keyrings/n.wtf.gpg] https://mirror-cdn.xtom.com/sb/nginx/ $(lsb_release -sc) main&quot; | sudo tee /etc/apt/sources.list.d/n.wtf.list
</code></pre>
<p>On Debian, you can also enable it with <a href="https://m.ac/use-extrepo-add-third-party-repositories-debian/">extrepo</a>:</p>
<pre><code class="language-bash">sudo apt install extrepo -y
sudo extrepo enable n.wtf
</code></pre>
<p>Node.js</p>
<pre><code class="language-bash">curl -fsSL https://deb.nodesource.com/gpgkey/nodesource-repo.gpg.key | sudo gpg --dearmor -o /usr/share/keyrings/nodesource.gpg

echo &quot;deb [signed-by=/usr/share/keyrings/nodesource.gpg] https://deb.nodesource.com/node_24.x nodistro main&quot; | sudo tee /etc/apt/sources.list.d/nodesource.list
</code></pre>
<p>Or use extrepo:</p>
<pre><code class="language-bash">sudo apt install extrepo -y
sudo extrepo enable node_24.x
</code></pre>
<p>PostgreSQL</p>
<pre><code class="language-bash">curl -sSL https://www.postgresql.org/media/keys/ACCC4CF8.asc | sudo gpg --dearmor -o /usr/share/keyrings/postgresql.gpg

echo &quot;deb [arch=$(dpkg --print-architecture) signed-by=/usr/share/keyrings/postgresql.gpg] http://apt.postgresql.org/pub/repos/apt $(lsb_release -cs)-pgdg main&quot; | sudo tee /etc/apt/sources.list.d/postgresql.list
</code></pre>
<p>Or use extrepo:</p>
<pre><code class="language-bash">sudo apt install extrepo -y
sudo extrepo enable postgresql
</code></pre>
<p>Redis</p>
<pre><code class="language-bash">curl -fsSL https://packages.redis.io/gpg | sudo gpg --dearmor -o /usr/share/keyrings/redis-archive-keyring.gpg

echo &quot;deb [signed-by=/usr/share/keyrings/redis-archive-keyring.gpg] https://packages.redis.io/deb $(lsb_release -cs) main&quot; | sudo tee /etc/apt/sources.list.d/redis.list
</code></pre>
<p>Or use extrepo:</p>
<pre><code class="language-bash">sudo apt install extrepo -y
sudo extrepo enable redis
</code></pre>
<p>Elasticsearch 8 (optional)</p>
<pre><code class="language-bash">curl -sS https://artifacts.elastic.co/GPG-KEY-elasticsearch | sudo gpg --dearmor -o /usr/share/keyrings/elasticsearch.gpg

echo &quot;deb [arch=$(dpkg --print-architecture) signed-by=/usr/share/keyrings/elasticsearch.gpg] https://artifacts.elastic.co/packages/8.x/apt stable main&quot; | sudo tee /etc/apt/sources.list.d/elasticsearch.list
</code></pre>
<p>Or use extrepo:</p>
<pre><code class="language-bash">sudo apt install extrepo -y
sudo extrepo enable elastic_8
</code></pre>
<p>Update the package lists:</p>
<pre><code class="language-bash">sudo apt update
</code></pre>
<hr>
<h2>4. Install system packages</h2>
<p>Install the system packages Mastodon needs:</p>
<pre><code class="language-bash">sudo apt install -y \
  imagemagick ffmpeg libpq-dev libxml2-dev libxslt1-dev file git \
  g++ libprotobuf-dev protobuf-compiler pkg-config nodejs gcc autoconf \
  bison build-essential libssl-dev libyaml-dev libreadline-dev \
  zlib1g-dev libncurses-dev libffi-dev libgdbm-dev \
  redis-server redis-tools postgresql postgresql-contrib \
  libidn11-dev libicu-dev libjemalloc-dev libvips nginx-extras
</code></pre>
<p>Enable Yarn through Corepack:</p>
<pre><code class="language-bash">sudo corepack enable
</code></pre>
<p>Enable the <code>redis-server</code> service:</p>
<pre><code class="language-bash">sudo systemctl enable --now redis-server
</code></pre>
<hr>
<h2>5. Create the Mastodon user</h2>
<p>Create a dedicated <code>mastodon</code> user:</p>
<pre><code class="language-bash">sudo adduser --disabled-password --gecos &quot;&quot; --home /home/mastodon mastodon
</code></pre>
<p>Then grant the right permissions for the <code>/home/mastodon</code> directory:</p>
<pre><code class="language-bash">sudo chmod 0755 /home/mastodon
</code></pre>
<hr>
<h2>6. Set up PostgreSQL</h2>
<p>Mastodon uses PostgreSQL as its database. Create a user named <code>mastodon</code> and allow it to create Mastodon&#39;s database:</p>
<pre><code class="language-bash">sudo -u postgres psql
CREATE USER mastodon CREATEDB;
\q
</code></pre>
<p>You can use <a href="https://pgtune.leopard.in.ua/">PGTune</a> to tune PostgreSQL for your server.</p>
<p>PGTune generates recommended settings from your RAM and CPU. Treat them as a starting point, not sacred text.</p>
<hr>
<h2>7. Install Mastodon</h2>
<p>Switch to the <code>mastodon</code> user and move into <code>/home/mastodon</code>. From here until you exit this shell, all commands run as the <code>mastodon</code> user without <code>sudo</code>:</p>
<pre><code class="language-bash">sudo -i -u mastodon
cd ~
</code></pre>
<p>Install <a href="https://github.com/rbenv/rbenv">rbenv</a>, a Ruby version manager:</p>
<pre><code class="language-bash">git clone https://github.com/rbenv/rbenv.git ~/.rbenv
cd ~/.rbenv &amp;&amp; src/configure &amp;&amp; make -C src
echo &#39;export PATH=&quot;$HOME/.rbenv/bin:$PATH&quot;&#39; &gt;&gt; ~/.bashrc
echo &#39;eval &quot;$(rbenv init -)&quot;&#39; &gt;&gt; ~/.bashrc
source ~/.bashrc
git clone https://github.com/rbenv/ruby-build.git ~/.rbenv/plugins/ruby-build
</code></pre>
<p>Clone the Mastodon Git repository and switch to the latest released version:</p>
<pre><code class="language-bash">cd ~
git clone https://github.com/mastodon/mastodon.git live &amp;&amp; cd live
git checkout $(git tag -l | grep &#39;^v[0-9.]*$&#39; | sort -V | tail -n 1)
</code></pre>
<p>After checkout, install the Ruby version required by Mastodon:</p>
<pre><code class="language-bash">RUBY_CONFIGURE_OPTS=--with-jemalloc rbenv install
</code></pre>
<p>Install the Ruby and JavaScript dependencies:</p>
<pre><code class="language-bash">bundle config deployment &#39;true&#39;
bundle config without &#39;development test&#39;
bundle install -j$(getconf _NPROCESSORS_ONLN)
yarn install --immutable
</code></pre>
<p>Wait for the install to finish before running the setup wizard.</p>
<hr>
<h2>8. Generate the Mastodon configuration file</h2>
<p>Run the interactive setup wizard:</p>
<pre><code>RAILS_ENV=production bin/rails mastodon:setup
</code></pre>
<p>This process will:</p>
<ul>
<li>Create a configuration file</li>
<li>Run asset precompilation</li>
<li>Create the database schema</li>
</ul>
<p>The configuration file is saved as <code>.env.production</code>. You can review and edit it as needed. For detailed options, see the <a href="https://docs.joinmastodon.org/admin/config/">official documentation</a>.</p>
<p>Leave the <code>mastodon</code> shell for now:</p>
<pre><code class="language-bash">exit
</code></pre>
<hr>
<h2>9. Configure Nginx and SSL certificates</h2>
<p>Use <a href="https://github.com/acmesh-official/acme.sh">acme.sh</a> to obtain free TLS certificates from Let&#39;s Encrypt. acme.sh is installed per user and its commands run without <code>sudo</code>; running this section as root (<code>sudo -i</code>) is recommended for reloading Nginx after certificate issuance:</p>
<pre><code>cd ~
git clone https://github.com/acmesh-official/acme.sh.git
cd ./acme.sh
./acme.sh --install -m user@example.com
source ~/.bashrc
acme.sh --upgrade --auto-upgrade
acme.sh --set-default-ca --server letsencrypt
</code></pre>
<p>Replace <code>user@example.com</code> with your actual email address. If you leave the example address, Let&#39;s Encrypt will reject it with an error like this:</p>
<pre><code class="language-bash">[Mon Apr 28 06:28:13 PM UTC 2025] Registering account: https://acme-v02.api.letsencrypt.org/directory
[Mon Apr 28 06:28:14 PM UTC 2025] Account registration error: {
  &quot;type&quot;: &quot;urn:ietf:params:acme:error:invalidContact&quot;,
  &quot;detail&quot;: &quot;Error creating new account :: contact email has forbidden domain \&quot;example.com\&quot;&quot;,
  &quot;status&quot;: 400
}
</code></pre>
<p>Create a directory for Let&#39;s Encrypt HTTP-01 verification and another directory for the SSL certificates:</p>
<pre><code class="language-bash">sudo mkdir -p /var/www/letsencrypt/.well-known/{acme-challenge,pki-validation}
sudo chown www-data:www-data /var/www/letsencrypt -R
sudo mkdir -p /etc/nginx/ssl
</code></pre>
<p>Modify the default Nginx configuration file.</p>
<pre><code class="language-bash">sudo bash -c &#39;cat &gt; /etc/nginx/sites-available/default &lt;&lt; &quot;EOF&quot;
server {
    listen 80 default_server;
    listen [::]:80 default_server;
    server_name _;

    location ~ ^/.well-known/(acme-challenge|pki-validation)/ {
      root /var/www/letsencrypt;
    }

    location / {
        return 301 https://$host$request_uri;
    }
}
EOF&#39;
</code></pre>
<p>This configuration redirects all requests on HTTP port 80 to HTTPS port 443, except for requests to <code>/.well-known/acme-challenge/</code> and <code>/.well-known/pki-validation/</code>, which are served from the <code>/var/www/letsencrypt</code> directory.</p>
<p>The <code>acme-challenge</code> path is what Let&#39;s Encrypt uses for HTTP-01 validation. The <code>pki-validation</code> path is kept for other certificate workflows.</p>
<p>Reload Nginx:</p>
<pre><code class="language-bash">sudo nginx -t
sudo nginx -s reload
</code></pre>
<p>Issue SSL certificates for your domain name:</p>
<pre><code class="language-bash">acme.sh --issue -d example.com -w /var/www/letsencrypt
</code></pre>
<blockquote>
<p>Replace <code>example.com</code> with your own domain name.</p>
</blockquote>
<p>Install the certificates to <code>/etc/nginx/ssl</code>:</p>
<pre><code class="language-bash">acme.sh --install-cert -d example.com \
--key-file       /etc/nginx/ssl/example.com.key  \
--fullchain-file /etc/nginx/ssl/example.com.crt \
--ca-file        /etc/nginx/ssl/example.com.ca.crt \
--reloadcmd     &quot;sudo systemctl restart nginx&quot;
</code></pre>
<p>You may need to add your current user to the <code>sudoers</code> file so acme.sh can restart Nginx without a password prompt. To do this, run:</p>
<pre><code class="language-bash">sudo visudo
</code></pre>
<p>Add the following line at the end of the file:</p>
<pre><code class="language-bash">your_username ALL=(ALL) NOPASSWD: /bin/systemctl restart nginx
</code></pre>
<p>Copy the Nginx configuration template from the Mastodon directory:</p>
<pre><code class="language-bash">sudo cp /home/mastodon/live/dist/nginx.conf /etc/nginx/sites-available/mastodon
sudo ln -s /etc/nginx/sites-available/mastodon /etc/nginx/sites-enabled/mastodon
</code></pre>
<p>The template needs three edits: your domain, your certificate paths, and one deleted block.</p>
<p>First, set your domain in a shell variable and let <code>sed</code> handle the renaming. The match side stays literal (that is exactly what the template says), and the replacement side carries your domain, so this works for any real domain:</p>
<pre><code class="language-bash">DOMAIN=example.com
sudo sed -i \
  -e &quot;s/server_name example.com;/server_name $DOMAIN;/g&quot; \
  -e &quot;s|# ssl_certificate     /etc/letsencrypt/live/example.com/fullchain.pem;|ssl_certificate     /etc/nginx/ssl/$DOMAIN.crt;|&quot; \
  -e &quot;s|# ssl_certificate_key /etc/letsencrypt/live/example.com/privkey.pem;|ssl_certificate_key /etc/nginx/ssl/$DOMAIN.key;|&quot; \
  /etc/nginx/sites-available/mastodon
</code></pre>
<p>This sets <code>server_name</code> in both server blocks, and uncomments the two <code>ssl_certificate</code> lines while pointing them at the certificates acme.sh installed to <code>/etc/nginx/ssl</code> earlier.</p>
<p>Then open the file and delete the server block that starts with <code>listen 80</code>. Our default site from section 9 already redirects HTTP to HTTPS and serves the ACME challenges, so this block would only get in the way of renewals:</p>
<pre><code class="language-nginx">server {
  listen 80;
  listen [::]:80;
  server_name example.com;
  root /home/mastodon/live/public;
  location /.well-known/acme-challenge/ { allow all; }
  location / { return 301 https://$host$request_uri; }
}
</code></pre>
<p>After the edits, the top of the remaining server block should look like this:</p>
<pre><code class="language-nginx">server {
  listen 443 ssl http2;
  listen [::]:443 ssl http2;
  server_name example.com;

  ssl_protocols TLSv1.2 TLSv1.3;

  ssl_prefer_server_ciphers on;
  ssl_session_cache shared:SSL:10m;
  ssl_session_tickets off;

  ssl_certificate     /etc/nginx/ssl/example.com.crt;
  ssl_certificate_key /etc/nginx/ssl/example.com.key;
</code></pre>
<p>Create a cache folder for Nginx and reload it:</p>
<pre><code class="language-bash">sudo mkdir -p /var/cache/nginx
sudo chown www-data:www-data /var/cache/nginx -R
sudo nginx -t
sudo nginx -s reload
</code></pre>
<hr>
<h2>10. Set up systemd services</h2>
<p>Copy the systemd service templates from the Mastodon directory.</p>
<pre><code class="language-bash">sudo cp /home/mastodon/live/dist/mastodon-*.service /etc/systemd/system/
</code></pre>
<p>Start and enable the new systemd services:</p>
<pre><code class="language-bash">sudo systemctl daemon-reload
sudo systemctl enable --now mastodon-web mastodon-sidekiq mastodon-streaming
</code></pre>
<p>Visit <code>https://example.com/</code> in your browser to open your Mastodon instance.</p>
<hr>
<h2>11. Enable Elasticsearch (optional)</h2>
<p>Mastodon supports full-text search when Elasticsearch is available. Enable it only if your server has enough RAM and CPU; otherwise, keep the instance lighter and skip this section.</p>
<p>If you have already added the official Elasticsearch 8.x repository, install it with apt:</p>
<pre><code class="language-bash">sudo apt install elasticsearch
</code></pre>
<p>Create a <code>jvm.options</code> file to configure Elasticsearch memory usage:</p>
<pre><code class="language-bash">sudo bash -c &#39;echo &quot;-Xms2g
-Xmx2g&quot; &gt; /etc/elasticsearch/jvm.options.d/jvm.options&#39;
</code></pre>
<p>Elasticsearch 8 ships with security enabled but serves HTTPS with a self-signed certificate by default. For a localhost-only node it is simpler to keep authentication and turn off TLS on the HTTP layer:</p>
<pre><code class="language-bash">echo &quot;xpack.security.http.ssl.enabled: false&quot; | sudo tee -a /etc/elasticsearch/elasticsearch.yml
</code></pre>
<p>Enable and start the systemd service:</p>
<pre><code class="language-bash">sudo systemctl daemon-reload
sudo systemctl enable --now elasticsearch
</code></pre>
<p>Set a password for the built-in <code>elastic</code> user and note it down:</p>
<pre><code class="language-bash">sudo /usr/share/elasticsearch/bin/elasticsearch-reset-password -u elastic
</code></pre>
<p>Edit the <code>/home/mastodon/live/.env.production</code> file and add the following lines, replacing <code>password</code> with the one you just generated:</p>
<pre><code class="language-bash"># Elasticsearch (optional)
# ------------------------
ES_ENABLED=true
ES_HOST=localhost
ES_PORT=9200
# Authentication for ES (optional)
ES_USER=elastic
ES_PASS=password
</code></pre>
<p>Restart the Mastodon services so they read the new settings:</p>
<pre><code class="language-bash">sudo systemctl restart mastodon-{web,sidekiq}
</code></pre>
<p>Run the following command to create the Elasticsearch indices and populate them with searchable data:</p>
<pre><code class="language-bash">sudo -i -u mastodon
RAILS_ENV=production /home/mastodon/live/bin/tootctl search deploy
</code></pre>
]]></content>
        <author>
            <name>Xiufeng Guo</name>
            <email>i@m.ac</email>
            <uri>https://m.ac</uri>
        </author>
        <published>2025-04-27T22:20:08.000Z</published>
    </entry>
    <entry>
        <title type="html"><![CDATA[How to upgrade from Debian 12 Bookworm to Debian 13 Trixie]]></title>
        <id>https://m.ac/upgrade-debian-12-to-13/</id>
        <link href="https://m.ac/upgrade-debian-12-to-13/"/>
        <updated>2025-08-19T10:27:20.000Z</updated>
        <summary type="html"><![CDATA[Upgrade a Debian 12 Bookworm system to Debian 13 Trixie without skipping the boring but important parts.]]></summary>
        <content type="html"><![CDATA[<h2>Introduction</h2>
<h3>What is Debian?</h3>
<p><a href="https://debian.org/">Debian</a> is a free and open source Linux distribution developed by the Debian Project, which Ian Murdock founded in August 1993. It is one of the oldest Linux distributions still in active use, and plenty of other distributions are built from it.</p>
<p>Debian 13, codenamed &quot;Trixie&quot;, was released on August 9, 2025. This guide walks through upgrading Debian 12 &quot;Bookworm&quot; to Debian 13 &quot;Trixie&quot;.</p>
<hr>
<h2>1. Prerequisites</h2>
<p><strong>Important:</strong> Make sure you are running on a dedicated server or a KVM/Xen-based VPS. OpenVZ and LXC are not supported for this upgrade.</p>
<p><strong>Before you start, make a full backup of your system.</strong></p>
<p>The following steps require root privileges. The commands use <code>sudo</code>, so make sure your user can run it. You can also switch to root with <code>sudo -i</code> and remove the <code>sudo</code> prefix from the commands.</p>
<h2>2. Update system</h2>
<p>Start by bringing the current Debian 12 system fully up to date:</p>
<pre><code class="language-bash">sudo apt update
sudo apt upgrade -y
sudo apt full-upgrade -y
sudo apt autoclean
sudo apt autoremove -y
</code></pre>
<p>If the kernel was updated, reboot before moving on. It is optional, but I recommend doing it anyway.</p>
<h2>3. Upgrade to Debian 13</h2>
<p>Replace <code>bookworm</code> with <code>trixie</code> in your APT source files:</p>
<pre><code class="language-bash">sudo sed -i &#39;s/bookworm/trixie/g&#39; /etc/apt/sources.list
sudo sed -i &#39;s/bookworm/trixie/g&#39; /etc/apt/sources.list.d/*.list
sudo sed -i &#39;s/bookworm/trixie/g&#39; /etc/apt/sources.list.d/*.sources
</code></pre>
<p>If the <code>.list</code> or <code>.sources</code> files are missing, you may see this error. You can ignore it:</p>
<pre><code class="language-bash">sed: can&#39;t read /etc/apt/sources.list.d/*.sources: No such file or directory
</code></pre>
<p>Or run the same replacement as one command:</p>
<pre><code class="language-bash">sudo sed -i &#39;s/bookworm/trixie/g&#39; /etc/apt/sources.list /etc/apt/sources.list.d/*.{list,sources} 2&gt;/dev/null
</code></pre>
<p>Your default <code>/etc/apt/sources.list</code> should then look like this:</p>
<pre><code class="language-bash">deb https://deb.debian.org/debian trixie main contrib non-free non-free-firmware

deb https://security.debian.org/debian-security trixie-security main contrib non-free non-free-firmware

deb https://deb.debian.org/debian trixie-updates main contrib non-free non-free-firmware
</code></pre>
<p>If you use the <a href="https://repolib.readthedocs.io/en/latest/deb822-format.html">DEB822 source format</a>, <code>/etc/apt/sources.list.d/debian.sources</code> should look like this:</p>
<pre><code class="language-bash">Types: deb
URIs: https://deb.debian.org/debian
Suites: trixie trixie-updates trixie-backports
Components: main contrib non-free non-free-firmware
Signed-By: /usr/share/keyrings/debian-archive-keyring.gpg

Types: deb
URIs: https://security.debian.org/debian-security
Suites: trixie-security
Components: main contrib non-free non-free-firmware
Signed-By: /usr/share/keyrings/debian-archive-keyring.gpg
</code></pre>
<p>Now update the package lists and run the upgrade:</p>
<pre><code class="language-bash">sudo apt update
sudo apt upgrade -y
sudo apt full-upgrade -y
</code></pre>
<p>If you remove the <code>-y</code> option, <code>apt</code> will ask before installing updates, restarting services, and making a few other changes. In the normal upgrade path, you can answer <strong>Yes</strong>.</p>
<p>For some configuration files, choose the option that fits your server. Pressing <strong>Enter</strong> usually keeps the existing file. You will often see this with packages such as <strong>OpenSSH</strong>.</p>
<p>When the <code>apt-listchanges: News</code> interface appears, you can press <strong>q</strong> to exit.</p>
<p><a href="https://macdn.net/2025/08/05/image_S2xQK.png"><img src="https://macdn.net/2025/08/05/image_S2xQK.png" alt="apt-listchanges"></a></p>
<p>For service restarts during package upgrades, you can choose the option to restart without asking:</p>
<p><a href="https://macdn.net/2025/08/05/image_CeXju.png"><img src="https://macdn.net/2025/08/05/image_CeXju.png" alt="Restart services during package upgrades without asking"></a></p>
<p>When prompted about a modified configuration file, choose whether to keep yours or install the package maintainer&#39;s version:</p>
<p><a href="https://macdn.net/2025/08/05/image_v7Yk2.png"><img src="https://macdn.net/2025/08/05/image_v7Yk2.png" alt="Modify the configuration file"></a></p>
<p>Some package updates change systemd service definitions. If you see a warning about that, run <code>sudo systemctl daemon-reload</code> to reload the updated configuration.</p>
<p>Once the upgrade is complete, remove packages and dependencies that are no longer needed:</p>
<pre><code class="language-bash">sudo apt autoclean
sudo apt autoremove -y
</code></pre>
<p>Reboot with <code>sudo reboot</code>, then verify the installed Debian version:</p>
<pre><code class="language-bash">root@debian ~ # cat /etc/debian_version 
13.0
</code></pre>
<pre><code class="language-bash">root@debian ~ # lsb_release -a
No LSB modules are available.
Distributor ID:	Debian
Description:	Debian GNU/Linux 13 (trixie)
Release:	13
Codename:	trixie
</code></pre>
<pre><code class="language-bash">root@debian ~ # uname -a
Linux n 6.12.41+deb13-cloud-amd64 #1 SMP PREEMPT_DYNAMIC Debian 6.12.41-1 (2025-08-12) x86_64 GNU/Linux
</code></pre>
<p>That is it. The system is now running Debian 13 with the new kernel.</p>
]]></content>
        <author>
            <name>Xiufeng Guo</name>
            <email>i@m.ac</email>
            <uri>https://m.ac</uri>
        </author>
        <published>2025-08-19T10:20:49.000Z</published>
    </entry>
    <entry>
        <title type="html"><![CDATA[Build a WHOIS compatibility server with Python and Nginx]]></title>
        <id>https://m.ac/build-whois-server-python-nginx/</id>
        <link href="https://m.ac/build-whois-server-python-nginx/"/>
        <updated>2025-05-18T17:52:51.000Z</updated>
        <summary type="html"><![CDATA[Build a small WHOIS compatibility server with Python and Nginx that points old port 43 clients toward RDAP.]]></summary>
        <content type="html"><![CDATA[<h2>Background</h2>
<p>ICANN&#39;s <a href="https://www.icann.org/en/announcements/details/icann-update-launching-rdap-sunsetting-whois-27-01-2025-en">January 27, 2025 update</a> made RDAP the definitive source for gTLD registration data, with legacy WHOIS services retired. For new registration data lookups, use <a href="https://www.icann.org/en/contracted-parties/registry-operators/resources/registration-data-access-protocol">RDAP</a>.</p>
<p>The <a href="https://en.wikipedia.org/wiki/Registration_Data_Access_Protocol">Registration Data Access Protocol</a> (RDAP) is the successor to the <a href="https://en.wikipedia.org/wiki/WHOIS">traditional WHOIS protocol</a>. It uses HTTPS and structured responses instead of unencrypted, loosely formatted text over port 43.</p>
<p>If you run registry or registrar infrastructure, move clients to RDAP rather than keeping a full WHOIS service around forever. We have already completed that migration for <a href="https://xtom.com/">xTom GmbH</a> (IANA ID 3968).</p>
<p>Old applications still query WHOIS on port 43, so this server keeps compatibility clients from failing silently. It accepts the connection and returns a plain message that points users to RDAP.</p>
<hr>
<h2>1. Prerequisites</h2>
<p>There are two straightforward ways to build this kind of WHOIS compatibility endpoint: Nginx stream alone, or a small Python service behind Nginx.</p>
<p>The commands below use <code>sudo</code>. If you prefer a root shell, run <code>sudo -i</code> first and drop <code>sudo</code> from the commands.</p>
<p>Install the required packages:</p>
<pre><code class="language-bash">sudo apt update
sudo apt install -y lsb-release ca-certificates apt-transport-https curl gnupg dpkg python3
</code></pre>
<p>Add the N.WTF repository, which provides an Nginx mainline build with the stream module enabled:</p>
<pre><code class="language-bash">curl -sS https://n.wtf/public.key | sudo gpg --dearmor -o /usr/share/keyrings/n.wtf.gpg

echo &quot;deb [arch=$(dpkg --print-architecture) signed-by=/usr/share/keyrings/n.wtf.gpg] https://mirror-cdn.xtom.com/sb/nginx/ $(lsb_release -sc) main&quot; | sudo tee /etc/apt/sources.list.d/n.wtf.list
</code></pre>
<p>Install Nginx:</p>
<pre><code class="language-bash">sudo apt install nginx-extras -y
</code></pre>
<hr>
<h2>2. Build a WHOIS server with the Nginx stream module</h2>
<p>The Nginx stream module can return a fixed message on port 43. Add this block to <code>/etc/nginx/nginx.conf</code>:</p>
<pre><code class="language-nginx">stream {
    # Define rate limiting zone
    limit_conn_zone $binary_remote_addr zone=whois_stream_conn:10m;

    # simple whois server
    server {
        listen 43;
        listen [::]:43;

        # Connection limits
        limit_conn whois_stream_conn 5;

        proxy_timeout 10s;

        # Return a message to the client
        return &quot;NOTICE: In accordance with ICANN compliance policies, our whois server has been discontinued. Please use the RDAP protocol for all domain whois queries.\n\nFor more information, please visit:\n\nhttps://www.icann.org/en/announcements/details/icann-update-launching-rdap-sunsetting-whois-27-01-2025-en\nhttps://www.icann.org/resources/pages/global-amendment-2023-en\n\n&quot;;
    }
}
</code></pre>
<p>Test the configuration and reload Nginx:</p>
<pre><code class="language-bash">sudo nginx -t
sudo nginx -s reload
</code></pre>
<p>Some WHOIS clients do not like this version. A query may print:</p>
<pre><code class="language-plaintext">fgets: Connection reset by peer
</code></pre>
<p>The Nginx stream <code>return</code> approach writes the message and closes the TCP session immediately. That is enough for some clients, but others report <code>fgets: Connection reset by peer</code> instead of printing the text cleanly.</p>
<p>Using a tiny Python service gives us better control over reading the query, writing the response, and closing the connection.</p>
<hr>
<h2>3. Build a WHOIS server with Python and Nginx</h2>
<p>The Python script listens locally and returns a predefined message to each WHOIS client.</p>
<p>Clone the repository and copy <code>whois.py</code> to <code>/opt/</code>:</p>
<pre><code class="language-bash">git clone https://git.m.ac/showfom/whois-server
cd whois-server
sudo cp -r whois.py /opt
</code></pre>
<p>Copy the systemd service template to <code>/etc/systemd/system/</code>:</p>
<pre><code class="language-bash">sudo cp -r whois-server.service /etc/systemd/system/
</code></pre>
<p>Enable and start the service:</p>
<pre><code class="language-bash">sudo systemctl daemon-reload
sudo systemctl enable --now whois-server
</code></pre>
<p>Test the WHOIS service locally:</p>
<pre><code class="language-bash">whois anything -h 127.0.0.1:10043
</code></pre>
<p>It should return the configured message:</p>
<pre><code class="language-plaintext">NOTICE: In accordance with ICANN compliance policies, our whois server has been discontinued. Please use the RDAP protocol for all domain whois queries.

For more information, please visit:

https://www.icann.org/en/announcements/details/icann-update-launching-rdap-sunsetting-whois-27-01-2025-en
https://www.icann.org/resources/pages/global-amendment-2023-en
</code></pre>
<p>Now configure Nginx to proxy public port 43 traffic to the local Python service.</p>
<p>Add this block to <code>/etc/nginx/nginx.conf</code>:</p>
<pre><code class="language-nginx">stream {
    # Define rate limiting zone
    limit_conn_zone $binary_remote_addr zone=whois_stream_conn:10m;

    # whois server
    server {
        listen 43;
        listen [::]:43;

        # Connection limits
        limit_conn whois_stream_conn 5;

        # Forward requests to the local Python script service
        proxy_pass 127.0.0.1:10043;
        proxy_timeout 30s;
    }
}
</code></pre>
<p>Test the configuration and reload Nginx:</p>
<pre><code class="language-bash">sudo nginx -t
sudo nginx -s reload
</code></pre>
<p>Query the public WHOIS endpoint:</p>
<pre><code class="language-bash">whois anything -h localhost
</code></pre>
<p>You can also create a WHOIS hostname with A and AAAA records pointing to this server, then submit that hostname wherever a registry still asks for an official WHOIS server.</p>
]]></content>
        <author>
            <name>Xiufeng Guo</name>
            <email>i@m.ac</email>
            <uri>https://m.ac</uri>
        </author>
        <published>2025-04-29T13:43:58.000Z</published>
    </entry>
    <entry>
        <title type="html"><![CDATA[Install Docker on Debian and Ubuntu]]></title>
        <id>https://m.ac/install-docker-debian-ubuntu/</id>
        <link href="https://m.ac/install-docker-debian-ubuntu/"/>
        <updated>2025-05-05T08:41:59.000Z</updated>
        <summary type="html"><![CDATA[Install Docker and Docker Compose on Debian Stable or Ubuntu LTS, add the official repository, enable IPv6, and try a small Compose stack.]]></summary>
        <content type="html"><![CDATA[<h2>Introduction</h2>
<h3>What is Docker?</h3>
<p><a href="https://www.docker.com/">Docker</a> packages an application and its dependencies into containers so it runs the same way on your laptop, a test box, and a production server. Fewer &quot;it works on my machine&quot; mysteries, which is usually worth the trouble.</p>
<h3>What is Docker Compose?</h3>
<p><a href="https://docs.docker.com/compose/">Docker Compose</a> manages multi-container Docker applications from one YAML file. You define the services once, then start them with a single command instead of juggling a small circus of <code>docker run</code> flags.</p>
<hr>
<h2>1. Prerequisites</h2>
<p>Make sure you have installed <a href="https://www.debian.org/releases/"><strong>Debian Stable</strong></a> (either <strong>oldstable</strong> or <strong>stable</strong> releases, <strong>sid</strong> is not supported) or <a href="https://releases.ubuntu.com/"><strong>Ubuntu LTS</strong></a> (Interim releases not supported).</p>
<p>The commands below use <code>sudo</code>. If you prefer a root shell, run <code>sudo -i</code> first and drop <code>sudo</code> from the commands. The <code>docker</code> commands are not prefixed with <code>sudo</code>: add your user to the <code>docker</code> group (<code>sudo usermod -aG docker $USER</code>, then log out and back in), or add <code>sudo</code> yourself.</p>
<p>Update your system and install the required tools.</p>
<pre><code class="language-bash">sudo apt update -y
sudo apt upgrade -y
sudo apt full-upgrade -y
sudo apt install curl vim wget gnupg dpkg apt-transport-https lsb-release ca-certificates -y
</code></pre>
<hr>
<h2>2. Install Docker and Docker Compose</h2>
<h3>2.1 Add Docker&#39;s GPG key</h3>
<pre><code class="language-bash">curl -sSL https://download.docker.com/linux/debian/gpg | sudo gpg --dearmor -o /usr/share/keyrings/docker-ce.gpg
</code></pre>
<h3>2.2 Add the Docker repository</h3>
<p>Debian:</p>
<pre><code class="language-bash">echo &quot;deb [arch=$(dpkg --print-architecture) signed-by=/usr/share/keyrings/docker-ce.gpg] https://download.docker.com/linux/debian $(lsb_release -sc) stable&quot; | sudo tee /etc/apt/sources.list.d/docker.list
</code></pre>
<p>On Debian, you can also enable it with <a href="https://m.ac/use-extrepo-add-third-party-repositories-debian/">extrepo</a>:</p>
<pre><code class="language-bash">sudo apt install extrepo -y
sudo extrepo enable docker-ce
</code></pre>
<p>Ubuntu:</p>
<pre><code class="language-bash">echo &quot;deb [arch=$(dpkg --print-architecture) signed-by=/usr/share/keyrings/docker-ce.gpg] https://download.docker.com/linux/ubuntu $(lsb_release -sc) stable&quot; | sudo tee /etc/apt/sources.list.d/docker.list
</code></pre>
<h3>2.3 Install</h3>
<pre><code class="language-bash">sudo apt update
sudo apt install docker-ce docker-ce-cli containerd.io docker-compose-plugin
</code></pre>
<p>Check the installed Docker version:</p>
<pre><code class="language-bash">$ docker version
Client: Docker Engine - Community
 Version:           29.6.1
 API version:       1.55
 Go version:        go1.26.4
 Git commit:        8900f1d
 Built:             Fri Jun 26 11:40:34 2026
 OS/Arch:           linux/amd64
 Context:           default

Server: Docker Engine - Community
 Engine:
  Version:          29.6.1
  API version:      1.55 (minimum version 1.40)
  Go version:       go1.26.4
  Git commit:       8ec5ab3
  Built:            Fri Jun 26 11:40:34 2026
  OS/Arch:          linux/amd64
  Experimental:     true
 containerd:
  Version:          v2.2.5
  GitCommit:        e53c7c1516c3b2bff98eb76f1f4117477e6f4e66
 runc:
  Version:          1.3.6
  GitCommit:        v1.3.6-0-g491b69ba
 docker-init:
  Version:          0.19.0
  GitCommit:        de40ad
</code></pre>
<p>Check Docker Compose too:</p>
<pre><code class="language-bash">$ docker compose version
Docker Compose version v5.3.
</code></pre>
<hr>
<h2>3. Add IPv6 support</h2>
<p>By default, Docker does not enable IPv6 for bridge networks. To turn it on, add the IPv6 settings to the Docker daemon configuration.</p>
<blockquote>
<p>Warning: Some containers do not behave well with IPv6. Test the applications you plan to run before relying on it in production.</p>
</blockquote>
<p>Create or edit the Docker daemon configuration file:</p>
<pre><code class="language-bash">sudo bash -c &#39;cat &gt; /etc/docker/daemon.json &lt;&lt; EOF
{
    &quot;log-driver&quot;: &quot;json-file&quot;,
    &quot;log-opts&quot;: {
        &quot;max-size&quot;: &quot;20m&quot;,
        &quot;max-file&quot;: &quot;3&quot;
    },
    &quot;userland-proxy&quot;: false,
    &quot;ipv6&quot;: true,
    &quot;fixed-cidr-v6&quot;: &quot;fdba::/64&quot;,
    &quot;experimental&quot;:true,
    &quot;ip6tables&quot;:true
}
EOF&#39;
</code></pre>
<p>Restart Docker so it reads the new configuration:</p>
<pre><code class="language-bash">sudo systemctl restart docker
</code></pre>
<p>Test IPv6 support by creating a Docker network named <code>ipv6_network</code>:</p>
<pre><code class="language-bash">docker network create --ipv6 --subnet=fd00::/64 ipv6_network
</code></pre>
<p>Then use the <code>curlimages/curl</code> image to make an IPv6 request:</p>
<pre><code class="language-bash">docker run --rm --network ipv6_network curlimages/curl:latest curl -6 ip.sb -s
</code></pre>
<p>If the command prints your public IPv6 address, Docker&#39;s IPv6 bridge networking is working.</p>
<hr>
<h2>4. Use rootless mode (optional)</h2>
<p><a href="https://docs.docker.com/engine/security/rootless/">Rootless mode</a> lets the Docker daemon and containers run as a non-root user. That reduces the damage if something goes wrong, although it does not make containers magically harmless.</p>
<blockquote>
<p>Warning: Some containers do not work in rootless mode. If a container behaves strangely, test it with regular Docker before blaming the application.</p>
</blockquote>
<p>Install the required system packages:</p>
<pre><code class="language-bash">sudo apt install uidmap dbus-user-session docker-ce-rootless-extras
</code></pre>
<blockquote>
<p>Note: The <code>docker-ce-rootless-extras</code> package is already included in the Docker installation.</p>
</blockquote>
<p>Create a new user named <code>showfom</code>, or use another name if you prefer:</p>
<pre><code class="language-bash">sudo adduser --disabled-password --gecos &quot;&quot; --home /home/showfom showfom
</code></pre>
<p>Disable the currently running Docker services:</p>
<pre><code class="language-bash">sudo systemctl disable --now docker.service docker.socket
sudo rm /var/run/docker.sock
</code></pre>
<p>Enable lingering for the <code>showfom</code> user, so its systemd user manager (and the rootless Docker daemon under it) starts at boot and survives logout:</p>
<pre><code class="language-bash">sudo loginctl enable-linger showfom
</code></pre>
<p>Switch to the <code>showfom</code> user and run the <code>dockerd-rootless-setuptool.sh</code> script. Use <code>machinectl shell</code> rather than <code>su</code>: the setup script talks to <code>systemctl --user</code>, which needs a real systemd login session that <code>sudo su -</code> does not provide:</p>
<pre><code class="language-bash">sudo machinectl shell showfom@
/usr/bin/dockerd-rootless-setuptool.sh install
</code></pre>
<p>If <code>machinectl</code> is missing, install it with <code>sudo apt install systemd-container -y</code>.</p>
<p>You should see output similar to the following:</p>
<pre><code class="language-bash">$ dockerd-rootless-setuptool.sh install
[INFO] Creating /home/showfom/.config/systemd/user/docker.service
[INFO] starting systemd service docker.service
+ systemctl --user start docker.service
+ sleep 3
+ systemctl --user --no-pager --full status docker.service
● docker.service - Docker Application Container Engine (Rootless)
     Loaded: loaded (/home/showfom/.config/systemd/user/docker.service; disabled; preset: enabled)
     Active: active (running) since Wed 2025-04-30 14:53:19 UTC; 3s ago
       Docs: https://docs.docker.com/go/rootless/
   Main PID: 227068 (rootlesskit)
      Tasks: 39
     Memory: 58.2M
        CPU: 398ms
     CGroup: /user.slice/user-1000.slice/user@1000.service/app.slice/docker.service
             ├─227068 rootlesskit --state-dir=/run/user/1000/dockerd-rootless --net=slirp4netns --mtu=65520 --slirp4netns-sandbox=auto --slirp4netns-seccomp=auto --disable-host-loopback --port-driver=builtin --copy-up=/etc --copy-up=/run --propagation=rslave /usr/bin/dockerd-rootless.sh
             ├─227080 /proc/self/exe --state-dir=/run/user/1000/dockerd-rootless --net=slirp4netns --mtu=65520 --slirp4netns-sandbox=auto --slirp4netns-seccomp=auto --disable-host-loopback --port-driver=builtin --copy-up=/etc --copy-up=/run --propagation=rslave /usr/bin/dockerd-rootless.sh
             ├─227104 slirp4netns --mtu 65520 -r 3 --disable-host-loopback --enable-sandbox --enable-seccomp 227080 tap0
             ├─227112 dockerd
             └─227132 containerd --config /run/user/1000/docker/containerd/containerd.toml

Apr 30 14:53:19 m dockerd-rootless.sh[227112]: time=&quot;2025-04-30T14:53:19.393381898Z&quot; level=warning msg=&quot;WARNING: No io.max (rbps) support&quot;
Apr 30 14:53:19 m dockerd-rootless.sh[227112]: time=&quot;2025-04-30T14:53:19.393387228Z&quot; level=warning msg=&quot;WARNING: No io.max (wbps) support&quot;
Apr 30 14:53:19 m dockerd-rootless.sh[227112]: time=&quot;2025-04-30T14:53:19.393393279Z&quot; level=warning msg=&quot;WARNING: No io.max (riops) support&quot;
Apr 30 14:53:19 m dockerd-rootless.sh[227112]: time=&quot;2025-04-30T14:53:19.393398720Z&quot; level=warning msg=&quot;WARNING: No io.max (wiops) support&quot;
Apr 30 14:53:19 m dockerd-rootless.sh[227112]: time=&quot;2025-04-30T14:53:19.393415330Z&quot; level=info msg=&quot;Docker daemon&quot; commit=01f442b containerd-snapshotter=false storage-driver=overlay2 version=28.1.1
Apr 30 14:53:19 m dockerd-rootless.sh[227112]: time=&quot;2025-04-30T14:53:19.393481325Z&quot; level=info msg=&quot;Initializing buildkit&quot;
Apr 30 14:53:19 m dockerd-rootless.sh[227112]: time=&quot;2025-04-30T14:53:19.420441982Z&quot; level=info msg=&quot;Completed buildkit initialization&quot;
Apr 30 14:53:19 m dockerd-rootless.sh[227112]: time=&quot;2025-04-30T14:53:19.425685368Z&quot; level=info msg=&quot;Daemon has completed initialization&quot;
Apr 30 14:53:19 m dockerd-rootless.sh[227112]: time=&quot;2025-04-30T14:53:19.425749069Z&quot; level=info msg=&quot;API listen on /run/user/1000/docker.sock&quot;
Apr 30 14:53:19 m systemd[226972]: Started docker.service - Docker Application Container Engine (Rootless).
+ DOCKER_HOST=unix:///run/user/1000/docker.sock /usr/bin/docker version
Client: Docker Engine - Community
 Version:           28.1.1
 API version:       1.49
 Go version:        go1.23.8
 Git commit:        4eba377
 Built:             Fri Apr 18 09:52:57 2025
 OS/Arch:           linux/amd64
 Context:           default

Server: Docker Engine - Community
 Engine:
  Version:          28.1.1
  API version:      1.49 (minimum version 1.24)
  Go version:       go1.23.8
  Git commit:       01f442b
  Built:            Fri Apr 18 09:52:57 2025
  OS/Arch:          linux/amd64
  Experimental:     false
 containerd:
  Version:          1.7.27
  GitCommit:        05044ec0a9a75232cad458027ca83437aae3f4da
 runc:
  Version:          1.2.5
  GitCommit:        v1.2.5-0-g59923ef
 docker-init:
  Version:          0.19.0
  GitCommit:        de40ad0
 rootlesskit:
  Version:          2.3.4
  ApiVersion:       1.1.1
  NetworkDriver:    slirp4netns
  PortDriver:       builtin
  StateDir:         /run/user/1000/dockerd-rootless
 slirp4netns:
  Version:          1.2.0
  GitCommit:        656041d45cfca7a4176f6b7eed9e4fe6c11e8383
+ systemctl --user enable docker.service
Created symlink /home/showfom/.config/systemd/user/default.target.wants/docker.service → /home/showfom/.config/systemd/user/docker.service.
[INFO] Installed docker.service successfully.
[INFO] To control docker.service, run: `systemctl --user (start|stop|restart) docker.service`
[INFO] To run docker.service on system startup, run: `sudo loginctl enable-linger showfom`

[INFO] Creating CLI context &quot;rootless&quot;
Successfully created context &quot;rootless&quot;
[INFO] Using CLI context &quot;rootless&quot;
Current context is now &quot;rootless&quot;

[INFO] Make sure the following environment variable(s) are set (or add them to ~/.bashrc):
export PATH=/usr/bin:$PATH

[INFO] Some applications may require the following environment variable too:
export DOCKER_HOST=unix:///run/user/1000/docker.sock
</code></pre>
<p>Add the following environment variables:</p>
<pre><code class="language-bash">echo &#39;export PATH=/usr/bin:$PATH&#39; &gt;&gt; ~/.bashrc
echo &#39;export DOCKER_HOST=unix:///run/user/1000/docker.sock&#39; &gt;&gt; ~/.bashrc
source ~/.bashrc
</code></pre>
<p>Enable the Docker service for the user:</p>
<pre><code class="language-bash">systemctl --user enable --now docker
systemctl --user status docker
</code></pre>
<p>You will see output like this:</p>
<pre><code class="language-bash">$ systemctl --user status docker
● docker.service - Docker Application Container Engine (Rootless)
     Loaded: loaded (/home/showfom/.config/systemd/user/docker.service; enabled; preset: enabled)
     Active: active (running) since Wed 2025-04-30 14:53:19 UTC; 1min 13s ago
       Docs: https://docs.docker.com/go/rootless/
   Main PID: 227068 (rootlesskit)
      Tasks: 39
     Memory: 58.3M
        CPU: 463ms
     CGroup: /user.slice/user-1000.slice/user@1000.service/app.slice/docker.service
             ├─227068 rootlesskit --state-dir=/run/user/1000/dockerd-rootless --net=slirp4netns --mtu=65520 --slirp4netns-sandbox=auto -&gt;
             ├─227080 /proc/self/exe --state-dir=/run/user/1000/dockerd-rootless --net=slirp4netns --mtu=65520 --slirp4netns-sandbox=aut&gt;
             ├─227104 slirp4netns --mtu 65520 -r 3 --disable-host-loopback --enable-sandbox --enable-seccomp 227080 tap0
             ├─227112 dockerd
             └─227132 containerd --config /run/user/1000/docker/containerd/containerd.toml

Apr 30 14:53:19 debian dockerd-rootless.sh[227112]: time=&quot;2025-04-30T14:53:19.393381898Z&quot; level=warning msg=&quot;WARNING: No io.max (rbps) suppor&gt;
Apr 30 14:53:19 debian dockerd-rootless.sh[227112]: time=&quot;2025-04-30T14:53:19.393387228Z&quot; level=warning msg=&quot;WARNING: No io.max (wbps) suppor&gt;
Apr 30 14:53:19 debian dockerd-rootless.sh[227112]: time=&quot;2025-04-30T14:53:19.393393279Z&quot; level=warning msg=&quot;WARNING: No io.max (riops) suppo&gt;
Apr 30 14:53:19 debian dockerd-rootless.sh[227112]: time=&quot;2025-04-30T14:53:19.393398720Z&quot; level=warning msg=&quot;WARNING: No io.max (wiops) suppo&gt;
Apr 30 14:53:19 debian dockerd-rootless.sh[227112]: time=&quot;2025-04-30T14:53:19.393415330Z&quot; level=info msg=&quot;Docker daemon&quot; commit=01f442b conta&gt;
Apr 30 14:53:19 debian dockerd-rootless.sh[227112]: time=&quot;2025-04-30T14:53:19.393481325Z&quot; level=info msg=&quot;Initializing buildkit&quot;
Apr 30 14:53:19 debian dockerd-rootless.sh[227112]: time=&quot;2025-04-30T14:53:19.420441982Z&quot; level=info msg=&quot;Completed buildkit initialization&quot;
Apr 30 14:53:19 debian dockerd-rootless.sh[227112]: time=&quot;2025-04-30T14:53:19.425685368Z&quot; level=info msg=&quot;Daemon has completed initialization&quot;
Apr 30 14:53:19 debian dockerd-rootless.sh[227112]: time=&quot;2025-04-30T14:53:19.425749069Z&quot; level=info msg=&quot;API listen on /run/user/1000/docker&gt;
Apr 30 14:53:19 debian systemd[226972]: Started docker.service - Docker Application Container Engine (Rootless).
</code></pre>
<p>Docker is installed. Time to make sure Compose works too.</p>
<blockquote>
<p>Note: Docker rootless mode has limits, and some containers are not compatible with it.</p>
</blockquote>
<hr>
<h2>5. Try Docker Compose</h2>
<p>A tiny Nginx site is enough to check that Docker Compose is behaving.</p>
<p>Create a new directory, generate an <code>index.html</code> file, and add a simple Nginx configuration file named <code>default.conf</code>:</p>
<pre><code class="language-bash">mkdir html

echo &#39;Hello World&#39; &gt; ./html/index.html

echo &#39;server {
    listen 80 default_server;
    listen [::]:80 default_server;
    server_name  _;
    location / {
        root   /usr/share/nginx/html;
        index  index.html index.htm;
    }
}&#39; &gt; ./default.conf
</code></pre>
<p>Create a file named <code>compose.yaml</code>:</p>
<pre><code class="language-bash">echo &#39;name: nginx

services:
  nginx:
    image: nginx:latest
    ports:
      - &quot;8080:80&quot;
    volumes:
      - ./html:/usr/share/nginx/html
      - ./default.conf:/etc/nginx/conf.d/default.conf
    restart: always
    networks:
      - nginx-network
      
networks:
  nginx-network:
    name: nginx-network
    enable_ipv6: true
    driver: bridge
    ipam:
      driver: default
      config:
        - subnet: 192.168.0.0/24
          gateway: 192.168.0.1
        - subnet: &quot;fdba::/64&quot;
          gateway: &quot;fdba::1&quot;&#39; &gt; ./compose.yaml
</code></pre>
<p>Pull the required container images:</p>
<pre><code class="language-bash">docker compose pull
</code></pre>
<p>After the Nginx image has been pulled, start the container:</p>
<pre><code class="language-bash">docker compose up -d
</code></pre>
<p>Use <code>docker ps</code> to check that the container is running:</p>
<pre><code class="language-bash">$ docker ps
CONTAINER ID   IMAGE          COMMAND                  CREATED         STATUS         PORTS                                     NAMES
2e11699fbc47   nginx:latest   &quot;/docker-entrypoint.…&quot;   5 seconds ago   Up 5 seconds   0.0.0.0:8080-&gt;80/tcp, [::]:8080-&gt;80/tcp   nginx-nginx-1
</code></pre>
<p>Test Nginx over both IPv4 and IPv6.</p>
<p>IPv4:</p>
<pre><code class="language-bash">curl localhost:8080 -4
</code></pre>
<p>IPv6:</p>
<pre><code class="language-bash">curl localhost:8080 -6
</code></pre>
<p>If both commands print <code>Hello World</code>, Compose is doing its job. Stop the stack with <code>docker compose down</code>.</p>
]]></content>
        <author>
            <name>Xiufeng Guo</name>
            <email>i@m.ac</email>
            <uri>https://m.ac</uri>
        </author>
        <published>2025-04-30T15:00:00.000Z</published>
    </entry>
    <entry>
        <title type="html"><![CDATA[Hello World]]></title>
        <id>https://m.ac/hello-world/</id>
        <link href="https://m.ac/hello-world/"/>
        <updated>2025-04-27T17:48:13.000Z</updated>
        <content type="html"><![CDATA[<p>This is Xiufeng Guo&#39;s blog. It is new, a little empty, and likely to fill up with Linux notes before long. You can <a href="https://m.ac/rss.xml">subscribe</a> if you want email when new posts go up.</p>
]]></content>
        <author>
            <name>Xiufeng Guo</name>
            <email>i@m.ac</email>
            <uri>https://m.ac</uri>
        </author>
        <published>2025-04-27T16:37:44.000Z</published>
    </entry>
</feed>